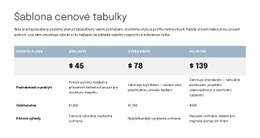
Jak používat prvek Tabulka při vytváření webové stránky


Návrhy stolních bloků
Můžete také snadno začít s prvkem Table. A můžete použít bloky vytvořené designérem obsahující prvek Tabulka. Klikněte na ikonu Přidat na panelu Rychlý přístup, přejděte dolů do části Tabulka, vyberte tabulku a libovolný návrh tabulky v otevřeném panelu.
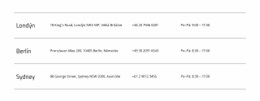
Sloupce a řádky tabulky
Podobně jako u jakéhokoli jiného prvku, který má sloupce a řádky, můžete změnit počet sloupců a řádků tabulky přetažením odpovídajících posuvníků na panelu vlastností pro vybraný prvek tabulky.

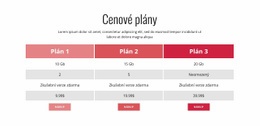
Styl stolu
Stejně jako všechny složené prvky v Nicepage oblíbené ve webovém designu můžete tabulku stylizovat podle svého rozvržení. Klepněte na prvek Tabulka v bloku. Přejděte na panel vlastností vpravo a kliknutím na odkazy sekcí přejděte na panely, kde můžete upravit odpovídající vlastnosti tabulky.
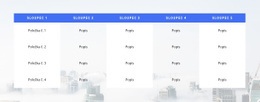
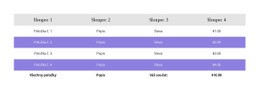
Přesun sloupců a řádků tabulky
Ve vybraném prvku tabulky můžete spravovat sloupce a řádky. Poté klikněte na tabulku ve vašem bloku a vyberte. Kliknutím na možnost Přesunout v nabídce pravého tlačítka myši nebo na ikonu Další možnosti kontextového panelu přesunete Sloupce doleva a doprava a Řádky nahoru a dolů.
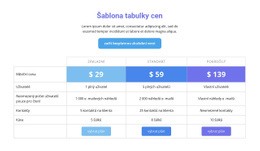
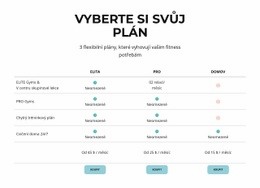
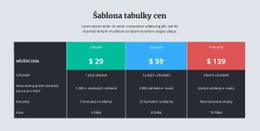
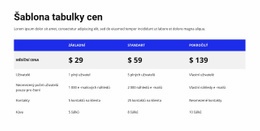
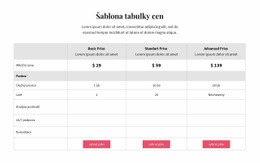
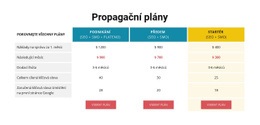
Šablony zdarma s Tabulka Element
Začněte s našimi nejlepšími šablonami, které jsou skvělé pro jakékoli podnikání. Vytvářejte a přizpůsobujte je pomocí našeho výkonného a bezplatného tvůrce webových stránek bez kódu. Všechny šablony jsou vhodné pro mobilní zařízení a vypadají skvěle na jakémkoli zařízení.


How To Create Tables For Your Nicepage Website?
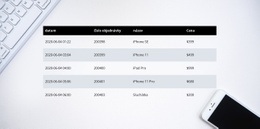
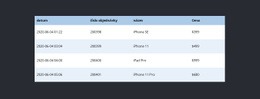
During the building of your site, you may require to create tables for various purposes. If you want to create a new table similar to the HTML Table Element, you must first decide how many columns & rows you will be using and what information you will present in them. Create new tables with blog post hyperlinks, modify table rows and columns with social media tools, or integrate as many columns and rows as you need using our program. So how the columns and rows are arranged and the number of columns & rows changed using the simple toolkit of our program?
Log in to your account using your email address or accounts in google or Facebook. Open the Add Elements, and select on the Table Element. The new table will appear on your page layout, and on the right side of it, you will see the panel, where all customization of your current and future new tables will occur. At any moment, you can add the required number of columns and rows in the table by dragging the slider table element below the columns and rows back and forth or manually by clicking on the responsive tables themselves to add new cells. Pick the different background colors for rows and columns using simple background color shading or the complex one combined with two colors to stress certain table data.
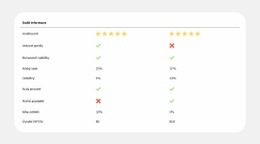
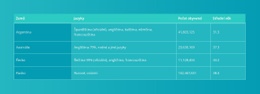
How to create a table with new drag and drop elements, and how do elements in your table element make it unique? Create responsive tables and quickly add the image element you want to the table header by clicking the star icon above the cell you want to customize. Like the HTML table and image elements, you can add a hyperlink to your blog post, email address, terms of service, or the contact form to the footer. If the table is too big, add the skip to content button to concentrate the visitor on the important content. Add a star rating element if you create new table data or modify an existing table for an online store or table data about various products or services quality with a blog post as proof. As an example of how you can create tables with a star rating, create a new table element, select a flashy background table header with the title name and decide how many stores or products you will review. Every store is placed on a separate table row, all information about the store, including a phone number, is provided in the first column, its blog post on a certain topic the second or third, and the rating is placed in the last column.