So verwenden Sie das Tabellenelement beim Erstellen einer Webseite


Tischblock-Designs
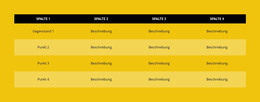
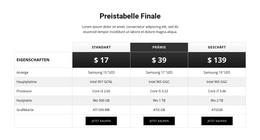
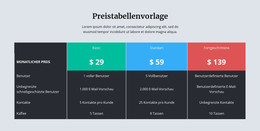
Sie können auch einfach mit dem Tabellenelement beginnen. Und Sie können die vom Designer erstellten Blöcke verwenden, die das Tabellenelement enthalten. Klicken Sie auf das Symbol „Hinzufügen“ in der Schnellzugriffsleiste, gehen Sie zum Abschnitt „Tabelle“, wählen Sie die Tabelle und ein beliebiges Tabellendesign im geöffneten Bereich aus.
Tabellenspalten und -zeilen
Ähnlich wie bei jedem anderen Element mit Spalten und Zeilen können Sie die Anzahl der Spalten und Zeilen der Tabelle ändern, indem Sie die entsprechenden Schieberegler im Eigenschaftenbereich für das ausgewählte Tabellenelement ziehen.

Tischgestaltung
Wie alle zusammengesetzten Elemente in Nicepage, die im Webdesign beliebt sind, können Sie die Tabelle nach Ihrem Layout stilisieren. Klicken Sie in einem Block auf das Tabellenelement. Gehen Sie rechts zum Eigenschaftenbereich und klicken Sie auf die Abschnittslinks, um zu den Bereichen zu gelangen und die entsprechenden Tabelleneigenschaften zu ändern.
Tabellenspalten und Zeilen verschieben
Sie können Spalten und Zeilen im ausgewählten Tabellenelement verwalten. Klicken Sie dann auf die Tabelle in Ihrem Block, um sie auszuwählen. Klicken Sie im Rechtsklickmenü der Maus auf die Option Verschieben oder auf das Symbol für weitere Optionen des Kontextbereichs, um Spalten nach links und rechts und Zeilen nach oben und unten zu verschieben.
Kostenlose Vorlagen mit Tabellenelement
Beginnen Sie mit unseren besten Vorlagen, die sich für jedes Unternehmen eignen. Erstellen und passen Sie sie mit unserem leistungsstarken und kostenlosen Website-Builder ohne Code an. Alle Vorlagen sind mobilfreundlich und sehen auf jedem Gerät hervorragend aus.
-

-

-
-
-
-
-
-
-
-
-
Kostenlose Website Builder SoftwareHerunterladen
-
EN
-
EN
-
-
EN
-
-
EN
-
EN
-
-
-
-
-
-
-
EN
-
-
EN
-
-
-
-
EN
-
-
EN
-
EN
-
-
-
EN
-
EN
-
EN
-
-
EN
-
Passen Sie eine beliebige Vorlage anHerunterladen
-
EN


How To Create Tables For Your Nicepage Website?
During the building of your site, you may require to create tables for various purposes. If you want to create a new table similar to the HTML Table Element, you must first decide how many columns & rows you will be using and what information you will present in them. Create new tables with blog post hyperlinks, modify table rows and columns with social media tools, or integrate as many columns and rows as you need using our program. So how the columns and rows are arranged and the number of columns & rows changed using the simple toolkit of our program?
Log in to your account using your email address or accounts in google or Facebook. Open the Add Elements, and select on the Table Element. The new table will appear on your page layout, and on the right side of it, you will see the panel, where all customization of your current and future new tables will occur. At any moment, you can add the required number of columns and rows in the table by dragging the slider table element below the columns and rows back and forth or manually by clicking on the responsive tables themselves to add new cells. Pick the different background colors for rows and columns using simple background color shading or the complex one combined with two colors to stress certain table data.
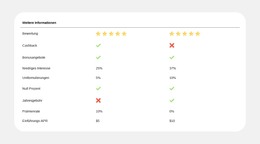
How to create a table with new drag and drop elements, and how do elements in your table element make it unique? Create responsive tables and quickly add the image element you want to the table header by clicking the star icon above the cell you want to customize. Like the HTML table and image elements, you can add a hyperlink to your blog post, email address, terms of service, or the contact form to the footer. If the table is too big, add the skip to content button to concentrate the visitor on the important content. Add a star rating element if you create new table data or modify an existing table for an online store or table data about various products or services quality with a blog post as proof. As an example of how you can create tables with a star rating, create a new table element, select a flashy background table header with the title name and decide how many stores or products you will review. Every store is placed on a separate table row, all information about the store, including a phone number, is provided in the first column, its blog post on a certain topic the second or third, and the rating is placed in the last column.