You will learn how to create a Menu with the Submenu Items. Your Items and Subitems can link to Pages, Blocks on Pages, Files, and external URLs.
The following video tutorial was made with one of the previous versions. We are updating the videos.
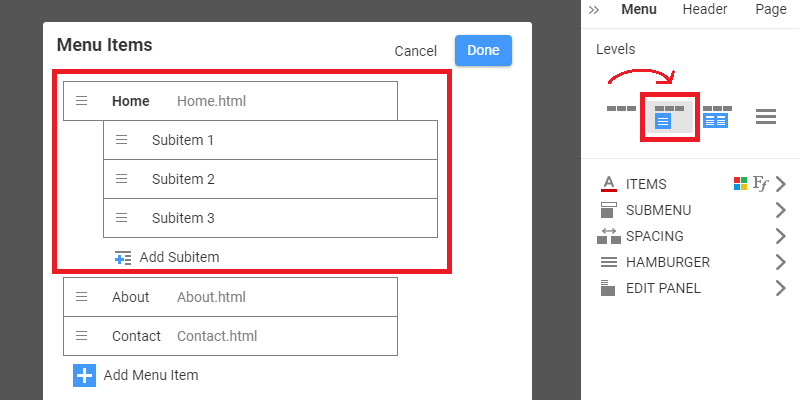
Edit Menu Dialog
The Nicepage Dashboard does not allow you to create a Menu with Subitems. Therefore, you need to open the Edit Menu Dialog.
- Run the Nicepage Application.
- Open or create a new Page.
- In the Nicepage Editor, select the Menu.
- Click the icon to open the Menu Editor.
Watch the video about how to make a Menu with the Nicepage Application.
Add Subitems
- In the Edit Menu dialog, add a New Item.
- Enter the Label.
- Press the Enter key or the Done button.
- To make it a Subitem, move this Item under another and then shift right.
Please note the Subitems are not visible on the top level of the Menu. You can see Subitems in the dropdown list by hovering over the Parent Item. Nicepage supports only two levels of Subitems in the Menu.
Edit Subitems
- Add a New Subitem right below an existing one.
- Enter the Label. Press the Enter key or the Done button.
- Rename Subitems. Please note that renaming Items and Subitems changes the actual names of your site pages.
- Reorder the Menu by moving Items and SubItems.
- Add another Subitem.
- To remove a Subitem, click the Delete Icon. Deleting Items and Subitems in the Menu does not remove site pages.
- Click Done.
- Preview the Page.
- Hover the Menu Item to see Subitems.
Automatically Change Menu Levels
If the No Levels option is selected for the Menu Levels and add Submenu Items, the Levels property automatically changes to the Menu With Submenu option.
Submenu Radius Property
You can also modify the Submenu Radius property.

Export Menu To WordPress or Joomla
The export and import to WordPress or Joomla are done as usual. Please watch the videos about editing menu with Nicepage WordPress Plugin or Nicepage Joomla Extension.
While exporting content for WordPress or Joomla, remember to check the Pages and Editor Plugin box in the Export Dialog. You can also watch the videos about exporting and updating content for WordPress or Joomla.
You have learned how to:
- Create a Menu with Subitems with the Nicepage Application
- Edit, move, and delete Subitems in the Menu
- Export and import the Menu with Subitems to WordPress or Joomla