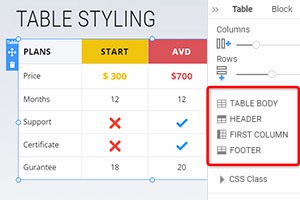
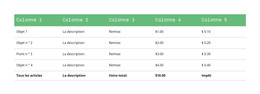
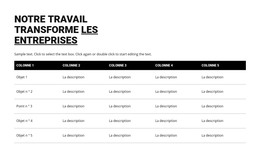
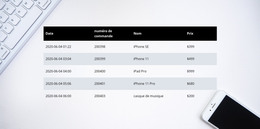
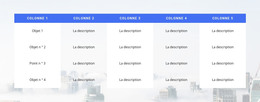
Comment déplacer des colonnes et des lignes dans l'élément Tableau
Tout ce dont vous avez besoin pour créer votre site Web gratuit
Utilisez notre Website Builder pour concevoir et créer des sites Web sans codage. Faites glisser et déposez tout ce que vous voulez, où vous le souhaitez. Le créateur de site Web adapte automatiquement votre site Web pour mobile afin de le rendre réactif. Choisissez parmi plus de 9 000 modèles de sites Web personnalisables.
Fonctionnalités associées
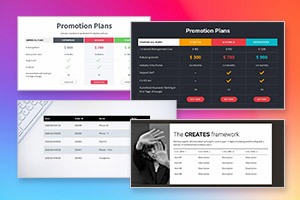
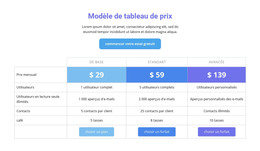
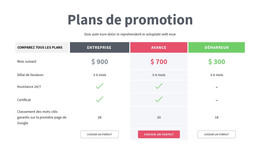
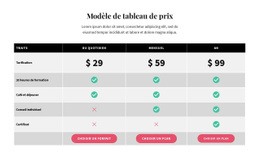
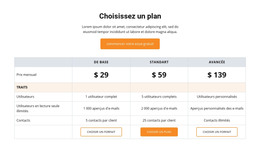
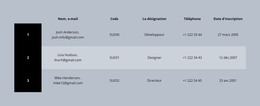
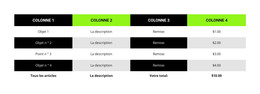
Modèles gratuits avec Élément de tableau
Commencez avec nos meilleurs modèles, parfaits pour toute entreprise. Créez et personnalisez-les avec notre créateur de site Web puissant et gratuit sans code. Tous les modèles sont adaptés aux mobiles et ont fière allure sur n'importe quel appareil.
-
-

-
-
-
-
-
-
-
-
-
Logiciel gratuit de création de site WebTélécharger
-
EN
-
EN
-
-
EN
-
-
EN
-
-
EN
-
-
-
-
-
-
EN
-
-
EN
-
-
-
-
EN
-
-
EN
-
EN
-
-
-
EN
-
EN
-
EN
-
-
EN
-
Personnalisez n'importe quel modèleTélécharger
-
EN


How To Move Table Rows And Columns
Tables may be important elements of web pages, giving your customers a lot of information and options. So you must be able to manage the layout of the table rows and columns to provide the customer with the right information. On the Nicepage page-builder, you can manage Columns and Rows in the selected Table element. For that, click on the Table in your Block to select. Click on the Move option in the mouse right-click menu or the Context Panel more options icon to move Columns to the left and right and Rows to the top and bottom.
You can drag and drop every element of a column and row to rearrange it. You can move the table column left or right. Using dragging column headers highlighted at the board's top, you can drag columns around. The column is locked except for the first column, which is in the scrollable area of the Table. Most important is to create the first and last row. You can represent an item within the list using a group of tables how your user can add a new group to the new Table from the property panel.
By getting started with the user version, you can change a column or move a row around the Table. How to Skip to Content without violating Terms of Privacy. If a user moves the column outside the list, it will change the whole content of the tables. How To change or add the first column, for that select group of tables, then go Tables property, then column property. Click to check the new features class is applied. Now you can add rows in the cell. Here is how the user can move tables using header cells. Click left, then right. This will open a new user group.