This article will teach you how to add a Widget Area to Page Content with the Nicepage WordPress Plugin.
The following video tutorial was made with one of the previous versions. We are updating the videos.
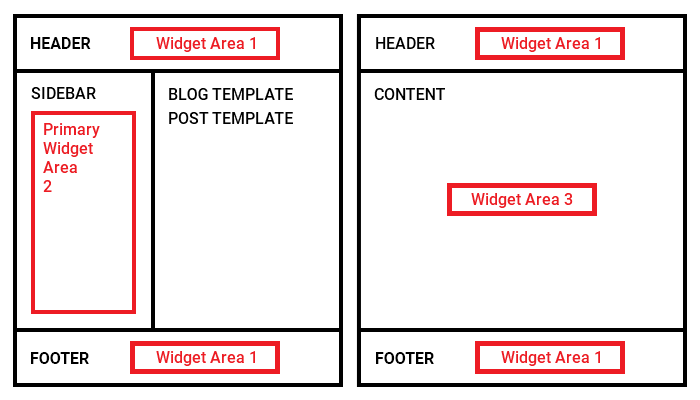
In WordPress, you can place widgets in three different ways.
- Widget Area in Header and Footer with App
- Sidebar and Primary Widget Area in Blog and Post with App
- Widget Area in Content with Plugin
Nicepage supports Widgets, Areas allowing you to extend the page functionality. You can output navigation, messages, banners, sliders, social posts, and more.
Add Widget Area
- Install any Nicepage Theme with the Nicepage WordPress Plugin.
- Create a New Page.
- Add a Blank Block
- Add the Widget Area Element. Click Add Plus -> Position and Shortcode -> Position and Widget Area.
- Resize the Widget Area.
- Center the Content in the Block with the Alignment icons in the Panel.
- Click Save
- Open Pages -> Page
- Click the permalink to preview.
- You should see the default Widget Area content.
Link Widget Areas
- Open the WordPress Administration in a new browser tab.
- Select Appearance -> Widgets
- Locate the Primary Widget Area.
- Add the Image widget.
- Select an image.
- Add the Text widget.
- Enter any text.
- Switch to the browser tab with the Nicepage Editor.
- Select the Widget Area Element in the Block.
- In the Property Panel, enter "Primary Widget Area" in the Existing Position Name field.
- Save the page
Preview Site
- Switch to the browser tab with the Page preview.
- Refresh the Page
You should see the image and text added as widgets into the Primary Widget Area.
You have learned:
- How to add a Widget Area with the Nicepage Plugin for WordPress.
- How to link a Widget Area created with Nicepage in WordPress.