If you have an active WordPress theme on your website, you can use the Nicepage Plugin only to edit the page content on your hosted WordPress website.

   The following video tutorial was made with one of the previous versions. We are updating the videos. 


Download WordPress Plugin

You can get the Nicepage WordPress Plugin from the Nicepage Website.

  1. Open your browser.
  2. Go to www.nicepage.com/download.
  3. Click on the Get WordPress Plugin button.
  4. Download the Nicepage WordPress Plugin as ZIP.

Install WordPress Plugin

Please do the following to install the Nicepage WordPress Plugin.

  1. Open your WordPress Admin.
  2. Go to the Plugins section.
  3. Click on the Add New button.
  4. Click the Upload Plugin button.
  5. Choose the downloaded ZIP file.
  6. Click the Install Now button.

Activate WordPress Plugin

After the installation, you need to activate the Nicepage WordPress Plugin.

  1. Click the Activate link.
  2. the new Nicepage section should be seen in the WordPress sidebar.
  3. Activation starts with the Wizard.
  4. You may skip this step with the content installation.

Create A New Page

On the last Wizard step, please do the following.

  1. Click the Create Page button to create a new page.
  2. choose a premade page Design or start with Blank in the New dialog.
  3. Edit the Page with the WordPress Editor Plugin.
  4. Click the Save icon on the Top Bar to save your work.

Check Plugin Version

Open your last working Page, then click the Help icon on the Quick Access Pane to check the installed version.
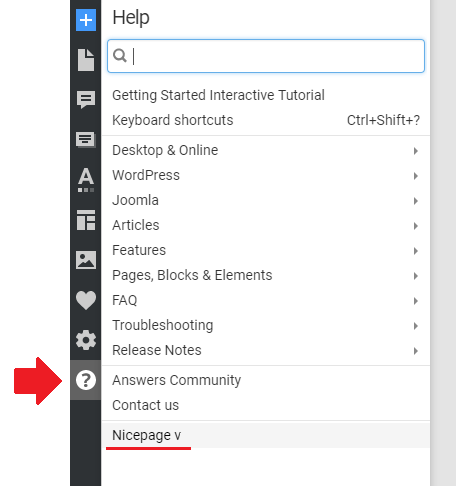
check-nicepage-version.png

Update WordPress Plugin

You will get an automatic notification to update your installed Nicepage WordPress plugin.

  1. Open the WordPress Admin.
  2. Go to the Plugins section.
  3. If there is a new version, you will see the note offering you to update the Plugin.
  4. Click the Update link.

If you have an active WordPress theme on your website, you can use the Nicepage Plugin only to edit the page content on **your hosted WordPress website**. ### <div style="background: #f3f3f3; padding: 15px"><pre style="font-family: Roboto;"> The following video tutorial was made with one of the previous versions. We are updating the videos. </pre></div> <br> <iframe style="width: 95%; aspect-ratio: 16 / 9;" src="https://www.youtube.com/embed/n8bswfZ11rw"></iframe> ### ## Download WordPress Plugin You can get the Nicepage WordPress Plugin from the Nicepage Website. 1. Open your browser. 2. Go to [www.nicepage.com/download](/download). 3. Click on the **Get WordPress Plugin** button. 4. Download the **Nicepage WordPress Plugin** as ZIP. ## Install WordPress Plugin Please do the following to install the Nicepage WordPress Plugin. 1. Open your WordPress Admin. 2. Go to the Plugins section. 3. Click on the Add New button. 4. Click the Upload Plugin button. 5. Choose the downloaded ZIP file. 6. Click the Install Now button. ## Activate WordPress Plugin After the installation, you need to activate the Nicepage WordPress Plugin. 1. Click the **Activate** link. 2. the new Nicepage section should be seen in the WordPress sidebar. 3. Activation starts with the Wizard. 4. You may skip this step with the content installation. ## Create A New Page On the last Wizard step, please do the following. 1. Click the Create Page button to create a new page. 2. choose a premade page Design or start with Blank in the New dialog. 3. Edit the Page with the WordPress Editor Plugin. 4. Click the Save icon on the Top Bar to save your work. ## Check Plugin Version Open your last working **Page**, then click the Help icon on the Quick Access Pane to check the installed version. !check-nicepage-version.png! ## Update WordPress Plugin You will get an automatic notification to update your installed Nicepage WordPress plugin. 1. Open the WordPress Admin. 2. Go to the Plugins section. 3. If there is a new version, you will see the note offering you to update the Plugin. 4. Click the Update link. ##