Welcome to Nicepage, a new product allowing to create any website design in minutes. Nicepage is available online, for Windows and Mac OS, and as a plugin for Joomla and WordPress. We will demonstrate Nicepage’s features using the Joomla Extension as an example.

Installation

Let’s start the introduction you to Nicepage step by step.

Downloading Joomla Plugin. We start with visiting nicepage.com website. Download the Nicepage Extension for Joomla. Open Joomla Admin. The plugin is installed as usually for plugins, as a zipped package.

Uploading Joomla Plugin. Go to the Admin panel -> Extensions -> Manage -> Install. Upload the plugin, selecting the downloaded zip from your local folder. After uploading the plugin is installed automatically.

install.png

Nicepage Menu In Joomla. After the installation, the Nicepage Item appears in the Joomla top menu. Add a new page from the Nicepage Menu -> New page.

Adding Web Pages

Starting with Blank or Builders. First, you can create pages from scratch. Second, you can build using the Page Builder. Upload images for the builder by simply dragging images from the local folder. Select images for sections, then choose a Style. All those pages are not pre-made and generated on-the-fly automatically.

quick-start-builder.jpg

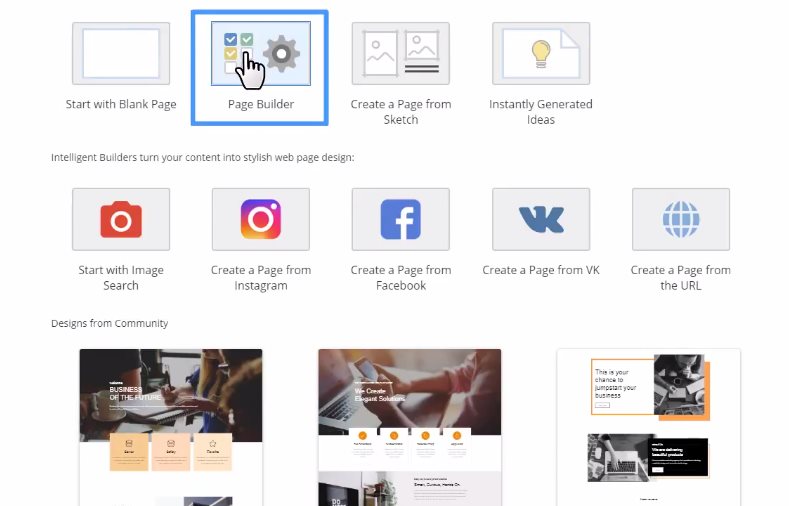
Pre-Designed Examples. Finally, you can always use the pre-designed examples made by designers. We can start with any of these samples. Let’s choose this one.

User Interface

Let’s start with a review of the basic UI elements of Nicepage Joomla Template Builder.

Top Bar. There is a Top panel containing the list of Joomla Articles, the Website Settings, the Theme Properties, the Add Menu at the top center.To the right, there are the Responsive Modes, the Preview and the Save, which saves the Article page.

ui-areas.jpg

Page Navigator. The Navigator is located to the left. It makes it easy to select and to operate sections. Each block has a menu, the Duplicate operation copies the current section. You can easily switch sections and change their ordering in the Navigator. Operations with block are performed easily, the same way it is done in the Microsoft PowerPoint or Apple KeyNote. If you want to delete a section, choose the Delete option from the Block Menu.

Block Editor. The central part of the Nicepage is the Block Editor. Here you can do various operations with controls, including: add, move, resize, align, etc. Working with the Editor is simple, again it is as easy as to work with Microsoft PowerPoint or Apple KeyNote. At that, you get the clean code and the responsive HTML in the output.

Property Panel. While choosing elements in the Editor, the Central part, we see the Properties shown in the Property Panel to the right. Changing the parameters changes the selected element. Also, in the panels there are Tabs allowing to reach the properties of the container, or the Section.

Theme Settings

Overview. All modern websites and themes have the Global Settings including the Color settings, the Font settings, and the Typography. Let’s review the Theme Settings in details.

theme-settings.jpg

Colors. We will start with the Colors setting the Palette. In reality, there are not that many websites that use more than five colors. Therefore, our Palettes are created to cover the need for the color variety, which allows realizing of any color ideas. Let’s choose this Palette. Now these colors are available for all elements of the web page.

Fonts. Now modify the Fonts. Our Font Schemes are created by picking from the most popular Google Fonts and Combinations. Select the Font Scheme.

Typography. Next, we will define the Typography. The Typography Sets change the text on the whole Article. The selected settings will be used for all texts by default. In addition, these typography elements are selected in the Text Style list. The detailed font tuning for an Article element is made in the Heading and Texts.

Working With Blocks (Sections) in Joomla

Adding Blocks. Proceeding to the Article design. Today, web pages are mostly made of sections, the main building blocks of the modern web design. Nicepage allows using the pre-designed sections, as well as building sections using the Builder and from scratch. Let’s Add a New Section.

adding-sections.png

Pre-Made Blocks. There are over a thousand of pre-designed sections available, and each of those sections has a unique design and layout. There is the Block Style list to the left, and Thematic Categories at the top. Selecting styles and categories you narrow down the number of offered sections allowing you to select the most appropriate one.

Block Styles. If you change your mind, or you don’t like the style you have just selected, you can easily choose another style for your section. Now we select another block style, and see the block has been changed. In addition, we can add more Spacing between cells.

Functional Blocks. Assume that you need a functional section, such as contact form, or address with a map. It is very easy to add such section. Add a new section. In the dialog select the Contact Form category. Select and add a block with the form and the map. After adding the section, if you click the map or the form control you see all available properties in the Panel to the right.

Using Builders In Joomla

Building Sections. Let’s add sections using the Builders. In the Add Block dialog click the Builder. For the block you can search images online, use images from any social accounts or your local folder. Drag images from your local folder. Select images for the section. Select required texts for the section. Then select a style from the generated variants. And, finally, add this block to your Article.

quick-start-section-builder.jpg

Building From Joomla Articles. The same way, we will add sections auto-generated from the Joomla Articles. Switch to Posts tab. Select Article images. Select Article Texts. Select a design.

Building from Products. Add a new block to show Products. Click Builder. Switch to the Products tab. Select Product images. Select Product Descriptions related to those Products. Select a style for the section. Click Done.

Editor

Starting from Blank. Let’s assume that you need your own idea for a section, a mock-up that you drew in any graphic editor, for example, Adobe Photoshop. This is the block we would like to add to our site. Let’s add a blank section. If needed, we can change the block height.

Add Menu. All added controls are located in the Add Menu to the top. In the Add Menu we see Containers, Basic Controls and Functional Controls.

Using Grids. To create this block we need to add a grid to which we will add the texts and images. Select “Grid” and add it to the section. Shrink the height and the width of this grid. Also, we change the location and position of the grid. As you can see, editing is very simple, as there are guiding magnets, and the sizes in the boxes helping to align.

adding-grid.jpg

Replacing Images. Let’s replace the images. Images are changed by dragging and dropping an image from the folder or the desktop into the section. It is simple to change the cell background from Image Fill to Color Fill. We also can change the crop of the background image. Let’s add Spacing to separate the cells visually. Collapse the image to make it a part of the content, and expand it back to the background. To switch cell positions, simply drag one cell over another.

Highlighting. While dragging containers, cells are highlighted with borders. Also there is a tip above the Destination Container, and it is always clear, where the moved control is located. To copy a cell or a control, drag the source holding the CTRL key. To remove a control or all the content in the cell, select the cell, then press the DELETE key. Now, we will change the fill color of the empty cell.

Adding Joomla Content

Adding Icons. Next, we will add the content to the cell. Start with an Icon, the most commonly used element in the text design. Let’s add an icon to the cell. Click the “Add”, and select the “Icon”. In the dialog, type “Idea” in the search field. We see the tabs filtering icons by styles. Select “All” and choose the Linear Light Bulb icon. For the Icon there are the most popular presets, we select the one with the circle. Preset Colors are used from the Palette set earlier. We stay with the first color.

adding-icon.jpg

Adding Texts. Add a Heading. Modify the Heading typing a new text. Change the Text Size and the Letter Spacing. If you don’t like the results or you changed your mind, undo the changes by selecting the Heading default from the list in the panel. We defined those Text Styles earlier in the Headings and Texts.

editing-text.jpg

Editing Texts. Add a Text. Select a part of the text and make it Bold and Italic. Select another part of the text and add a Hyperlink. Specify the destination Joomla Article in the dialog.

Adding Buttons. Add Button using the alternative way, by clicking the Plus to the right top of the cell. The Button also has presets. Let’s select the bordered one. Make the button rounded. Changed the Button Height. Enter the new text. After fine-tuning, select the Joomla Destination Article for the Button. Click Save to save the Article.

cell-alignment.jpg

Alignment In Cells. Alignment and consistency are the important design principles. Moving controls again we see the guiding magnets and sizes, which help to follow those principles.

Moving Elements. You can move the Heading, Icon, Text — any element, into the Block above the Grid and into another Cell. Containers are highlighted with borders and labeled with hints, therefore it is always clear in which container controls will be placed. Auto-align the content cells horizontally and vertically.

You see, the result is achieved much easier and way quicker, comparily to drawing this block mockup in a graphic editor like Adobe Photoshop.

Joomla Positions

To illustrate the work with Joomla positions we need one more section.

joomla-position.png

Using Joomla Positions. Add a blank section. Click the Add menu -> Joomla Position. Expand the widget area to the Sheet. Enter the position name into the Position field. The guiding magnets are very handy for resizing and aligning as well. To see the actual data output, click the Preview. This position shows the Featured Products.

We have completed adding sections.

Mobile Views In Joomla

Responsive Modes In Joomla. No modern design is complete if shown incorrectly on all modern devices, including mobile ones. The Article made in Nicepage is fully responsive and convenient for reading. In addition, for all Responsive Modes all editing features are supported. For example, you can change the cropping of an image or change the Heading size. Hide/show any element, for example a cell for a required device. Click "Save".

responsive.jpg

Using Joomla Templates

Switching templates. Go to Joomla Admin. Open Content -> Articles. Open the newly created Article. You can select any other Joomla template and click Save. As you can see, the Article looks differently not like is was designed in Nicepage. To show the Article correctly, select the Nicepage template with the Joomla Header and the Footer. Save the Article. The Article now looks NICE!

joomla-templates.png

Edit in Nicepage. In the Article screen in the admin we see the Nicepage Editor button. Clicking this button launches Nicepage for this Joomla Article. Click the Preview. You see that working in Nicepage is simple like in Microsoft PowerPoint or Apple KeyNote. The output you get is the clean code and fully responsive HTML.

We hope you have enjoyed this introduction to Nicepage for Joomla.

See Also

Get Started With Nicepage

Welcome to Nicepage, a new product allowing to create any website design in minutes. Nicepage is available online, for Windows and Mac OS, and as a plugin for Joomla and WordPress. We will demonstrate Nicepage’s features using the Joomla Extension as an example. <div class="video-container"><iframe width="885" height="500" src="//www.youtube.com/embed/ucmSo6YmjLc?rel=0" frameborder="0" allowfullscreen></iframe></div> ##Installation## Let’s start the introduction you to Nicepage step by step. **Downloading Joomla Plugin**. We start with visiting nicepage.com website. Download the Nicepage Extension for Joomla. Open Joomla Admin. The plugin is installed as usually for plugins, as a zipped package. **Uploading Joomla Plugin**. Go to the Admin panel -> Extensions -> Manage -> Install. Upload the plugin, selecting the downloaded zip from your local folder. After uploading the plugin is installed automatically. !install.png! **Nicepage Menu In Joomla**. After the installation, the Nicepage Item appears in the Joomla top menu. Add a new page from the Nicepage Menu -> New page. ##Adding Web Pages## **Starting with Blank or Builders**. First, you can create pages from scratch. Second, you can build using the Page Builder. Upload images for the builder by simply dragging images from the local folder. Select images for sections, then choose a Style. All those pages are not pre-made and generated on-the-fly automatically. !quick-start-builder.jpg! **Pre-Designed Examples**. Finally, you can always use the pre-designed examples made by designers. We can start with any of these samples. Let’s choose this one. ##User Interface## Let’s start with a review of the basic UI elements of Nicepage [Joomla Template Builder](https://nicepage.com/joomla). **Top Bar**. There is a Top panel containing the list of Joomla Articles, the Website Settings, the Theme Properties, the Add Menu at the top center.To the right, there are the Responsive Modes, the Preview and the Save, which saves the Article page. !ui-areas.jpg! **Page Navigator**. The Navigator is located to the left. It makes it easy to select and to operate sections. Each block has a menu, the Duplicate operation copies the current section. You can easily switch sections and change their ordering in the Navigator. Operations with block are performed easily, the same way it is done in the Microsoft PowerPoint or Apple KeyNote. If you want to delete a section, choose the Delete option from the Block Menu. **Block Editor**. The central part of the Nicepage is the Block Editor. Here you can do various operations with controls, including: add, move, resize, align, etc. Working with the Editor is simple, again it is as easy as to work with Microsoft PowerPoint or Apple KeyNote. At that, you get the clean code and the responsive HTML in the output. **Property Panel**. While choosing elements in the Editor, the Central part, we see the Properties shown in the Property Panel to the right. Changing the parameters changes the selected element. Also, in the panels there are Tabs allowing to reach the properties of the container, or the Section. ##Theme Settings## **Overview**. All modern websites and themes have the Global Settings including the Color settings, the Font settings, and the Typography. Let’s review the Theme Settings in details. !theme-settings.jpg! **Colors**. We will start with the Colors setting the Palette. In reality, there are not that many websites that use more than five colors. Therefore, our Palettes are created to cover the need for the color variety, which allows realizing of any color ideas. Let’s choose this Palette. Now these colors are available for all elements of the web page. **Fonts**. Now modify the Fonts. Our Font Schemes are created by picking from the most popular Google Fonts and Combinations. Select the Font Scheme. **Typography**. Next, we will define the Typography. The Typography Sets change the text on the whole Article. The selected settings will be used for all texts by default. In addition, these typography elements are selected in the Text Style list. The detailed font tuning for an Article element is made in the Heading and Texts. ##Working With Blocks (Sections) in Joomla## **Adding Blocks**. Proceeding to the Article design. Today, web pages are mostly made of sections, the main building blocks of the modern web design. Nicepage allows using the pre-designed sections, as well as building sections using the Builder and from scratch. Let’s Add a New Section. !adding-sections.png! **Pre-Made Blocks**. There are over a thousand of pre-designed sections available, and each of those sections has a unique design and layout. There is the Block Style list to the left, and Thematic Categories at the top. Selecting styles and categories you narrow down the number of offered sections allowing you to select the most appropriate one. **Block Styles**. If you change your mind, or you don’t like the style you have just selected, you can easily choose another style for your section. Now we select another block style, and see the block has been changed. In addition, we can add more Spacing between cells. **Functional Blocks**. Assume that you need a functional section, such as contact form, or address with a map. It is very easy to add such section. Add a new section. In the dialog select the Contact Form category. Select and add a block with the form and the map. After adding the section, if you click the map or the form control you see all available properties in the Panel to the right. ##Using Builders In Joomla## **Building Sections**. Let’s add sections using the Builders. In the Add Block dialog click the Builder. For the block you can search images online, use images from any social accounts or your local folder. Drag images from your local folder. Select images for the section. Select required texts for the section. Then select a style from the generated variants. And, finally, add this block to your Article. !quick-start-section-builder.jpg! **Building From Joomla Articles**. The same way, we will add sections auto-generated from the Joomla Articles. Switch to Posts tab. Select Article images. Select Article Texts. Select a design. **Building from Products**. Add a new block to show Products. Click Builder. Switch to the Products tab. Select Product images. Select Product Descriptions related to those Products. Select a style for the section. Click Done. ##Editor## **Starting from Blank**. Let’s assume that you need your own idea for a section, a mock-up that you drew in any graphic editor, for example, Adobe Photoshop. This is the block we would like to add to our site. Let’s add a blank section. If needed, we can change the block height. **Add Menu**. All added controls are located in the Add Menu to the top. In the Add Menu we see Containers, Basic Controls and Functional Controls. **Using Grids**. To create this block we need to add a grid to which we will add the texts and images. Select “Grid” and add it to the section. Shrink the height and the width of this grid. Also, we change the location and position of the grid. As you can see, editing is very simple, as there are guiding magnets, and the sizes in the boxes helping to align. !adding-grid.jpg! **Replacing Images**. Let’s replace the images. Images are changed by dragging and dropping an image from the folder or the desktop into the section. It is simple to change the cell background from Image Fill to Color Fill. We also can change the crop of the background image. Let’s add Spacing to separate the cells visually. Collapse the image to make it a part of the content, and expand it back to the background. To switch cell positions, simply drag one cell over another. **Highlighting**. While dragging containers, cells are highlighted with borders. Also there is a tip above the Destination Container, and it is always clear, where the moved control is located. To copy a cell or a control, drag the source holding the CTRL key. To remove a control or all the content in the cell, select the cell, then press the DELETE key. Now, we will change the fill color of the empty cell. ##Adding Joomla Content## **Adding Icons**. Next, we will add the content to the cell. Start with an Icon, the most commonly used element in the text design. Let’s add an icon to the cell. Click the “Add”, and select the “Icon”. In the dialog, type “Idea” in the search field. We see the tabs filtering icons by styles. Select “All” and choose the Linear Light Bulb icon. For the Icon there are the most popular presets, we select the one with the circle. Preset Colors are used from the Palette set earlier. We stay with the first color. !adding-icon.jpg! **Adding Texts**. Add a Heading. Modify the Heading typing a new text. Change the Text Size and the Letter Spacing. If you don’t like the results or you changed your mind, undo the changes by selecting the Heading default from the list in the panel. We defined those Text Styles earlier in the Headings and Texts. !editing-text.jpg! **Editing Texts**. Add a Text. Select a part of the text and make it Bold and Italic. Select another part of the text and add a Hyperlink. Specify the destination Joomla Article in the dialog. **Adding Buttons**. Add Button using the alternative way, by clicking the Plus to the right top of the cell. The Button also has presets. Let’s select the bordered one. Make the button rounded. Changed the Button Height. Enter the new text. After fine-tuning, select the Joomla Destination Article for the Button. Click Save to save the Article. !cell-alignment.jpg! **Alignment In Cells**. Alignment and consistency are the important design principles. Moving controls again we see the guiding magnets and sizes, which help to follow those principles. **Moving Elements**. You can move the Heading, Icon, Text — any element, into the Block above the Grid and into another Cell. Containers are highlighted with borders and labeled with hints, therefore it is always clear in which container controls will be placed. Auto-align the content cells horizontally and vertically. You see, the result is achieved much easier and way quicker, comparily to drawing this block mockup in a graphic editor like Adobe Photoshop. ##Joomla Positions## To illustrate the work with Joomla positions we need one more section. !joomla-position.png! **Using Joomla Positions**. Add a blank section. Click the Add menu -> Joomla Position. Expand the widget area to the Sheet. Enter the position name into the Position field. The guiding magnets are very handy for resizing and aligning as well. To see the actual data output, click the Preview. This position shows the Featured Products. We have completed adding sections. ##Mobile Views In Joomla## **Responsive Modes In Joomla**. No modern design is complete if shown incorrectly on all modern devices, including mobile ones. The Article made in Nicepage is fully responsive and convenient for reading. In addition, for all Responsive Modes all editing features are supported. For example, you can change the cropping of an image or change the Heading size. Hide/show any element, for example a cell for a required device. Click "Save". !responsive.jpg! ##Using Joomla Templates## **Switching templates**. Go to Joomla Admin. Open Content -> Articles. Open the newly created Article. You can select any other Joomla template and click Save. As you can see, the Article looks differently not like is was designed in Nicepage. To show the Article correctly, select the Nicepage template with the Joomla Header and the Footer. Save the Article. The Article now looks NICE! !joomla-templates.png! **Edit in Nicepage**. In the Article screen in the admin we see the Nicepage Editor button. Clicking this button launches Nicepage for this Joomla Article. Click the Preview. You see that working in Nicepage is simple like in Microsoft PowerPoint or Apple KeyNote. The output you get is the clean code and fully responsive HTML. We hope you have enjoyed this introduction to Nicepage for Joomla. ##See Also - [Installation of Nicepage for Joomla](page:4348) - [Joomla Positions with Nicepage](page:6700) - [Joomla Menu with Nicepage](page:9928) - [Nicepage on YouTube](https://www.youtube.com/playlist?list=PLrT1zCpaZbn5Td7n67dcjue4nba8VD9hh) - [Nicepage Video Tutorials](page:1318) ## Get Started With Nicepage - [Joomla Template Builder](https://nicepage.com/joomla)