The Nicepage Template is a fully customizable Joomla Template, including the Nicepage Extension. You can use the zip with the Template and Extension to install on new hosting and get a functional website in a few clicks. Let's proceed with the installation to your hosted Joomla website.
Export Joomla 3 Template
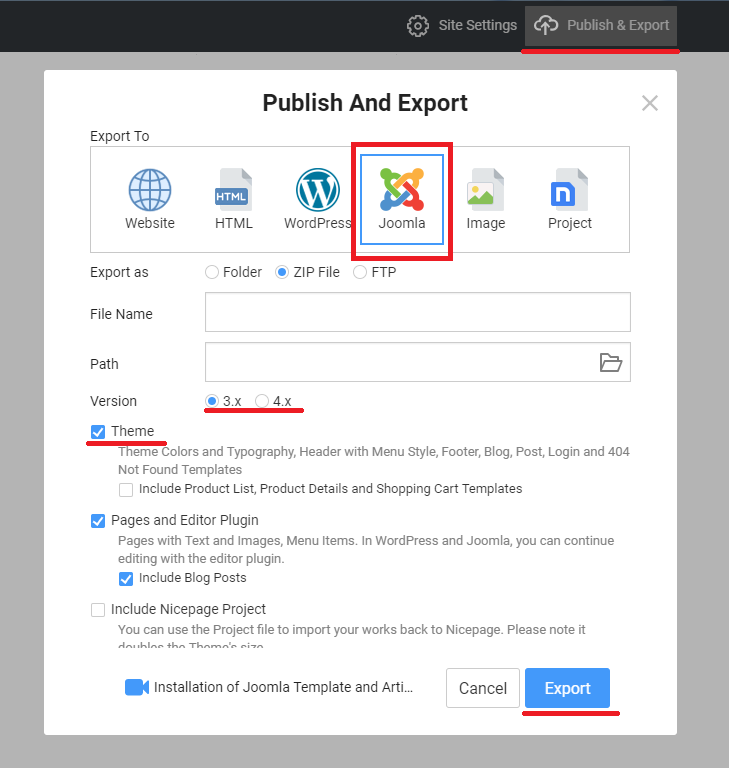
You can export the Nicepage Template from the Desktop Application for Windows or Mac OS.
- Run the Nicepage Application
- Open your working Project.
- Click the Publish & Export button on the Top Bar.
- Select the Joomla Tab.
- Choose the Joomla version 3.
- Specify the File Name and Path, if needed.
- Click the Export Button.
Install Nicepage Joomla 3 Template
- Open the Joomla Administrator.
- Open the "Extensions -> Manage -> Install" page.
- Select the "Upload & Install Joomla Extension" Tab.
- Select your Joomla Template zip.
- Drag and drop your Nicepage Joomla Template zip file or browse for it.
- The installation will start automatically.
- After the installation, there is a success message.
- Click "Extensions -> Templates: Styles"
- Click the Star Icon in your template row to make your template default.
Install Nicepage Extension
- Browse for your template zip on your local PC.
- Extract the Nicepage Template zip.
- Open the "extensions" folder.
- Locate the "nicepage.zip" file. It is the Nicepage Extension for Joomla.
- Open the "Extensions -> Manage -> Install" page.
- Select the "Upload & Install Joomla Extension" Tab.
- Select the "nicepage.zip" file.
- Drag and drop the Nicepage Extension zip or browse for it.
- The installation will start automatically.
- After the installation, the new Nicepage Tab in the Joomla Administrator Topbar.
Import Articles
- Click "Nicepage -> Import Data."
- On the Import page, click the "Choose Files" button.
- Select your template zip.
- You may replace the imported content.
- You may import content coloring and typography settings.
- Please note this may affect the appearance of your previously installed Nicepage Template.
- After the installation, you will see a success message.
Preview A Site
Click your website link to the top right to preview your website.
Edit Articles
You have installed the Template, Extension, and Content, and now you can continue creating and editing pages directly on your Joomla website.
- Open the "Content -> Articles" page.
- Click on your page's name to open your page details.
- Click the "Edit with Nicepage" button to run the Nicepage Editor.
You have learned about:
- Nicepage Template for Joomla
- The installation of the Nicepage Template, Extension, and Content in Joomla.
- The Preview and edit pages with the Nicepage Editor Extension.