Positions extend the page functionality allowing to improve the website navigation and output messages, as well as complex components including banners, sliders or social media posts.

Simple Sidebar In Joomla

Position Support. Nicepage fully supports the freedom of adding and moving positions. All added positions can have own styles. This demo covers three ways of using the Positions in Joomla. We start with adding a simple position inside the Nicepage Extension for Joomla. In Nicepage Joomla Template Builder start with any installed template in your Joomla website.

position.jpg

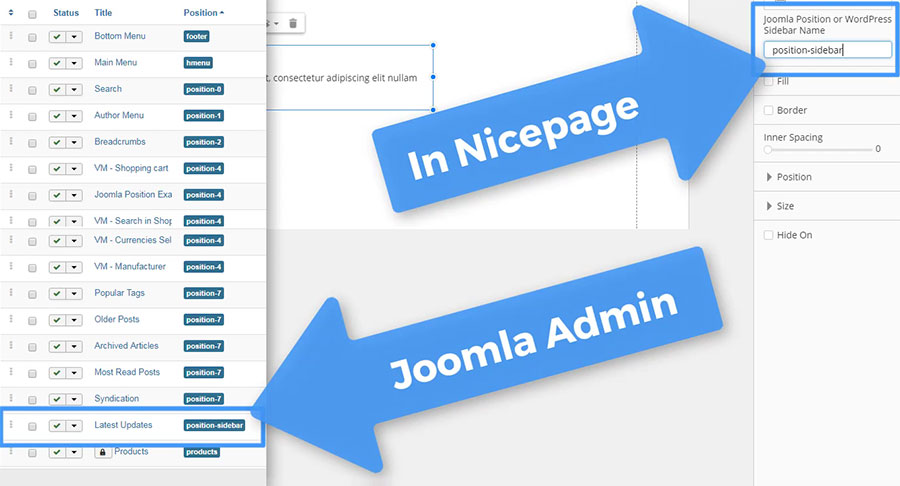
Adding Joomla Position. Start with a Blank Page. Add a Position. Click Add -> Position and Shortcode -> Position and Sidebar. Resize the Position. Align the Position. Enter “position-sidebar” in the Joomla Position field.
postions-nicepage.jpg

Linking Joomla Position. Open the Modules. Select Extension -> Modules. Add a New Module. Select Custom. Enter the “Latest Updates” Title. Select the Image. Resize the Image. Enter the Text. Finally, select the “position-sidebar” position. Click Save and Close. Return to Nicepage Extension. Note this is the same position name you used in the Nicepage Extension. Click Preview.

Adding Sidebar to Joomla Templates

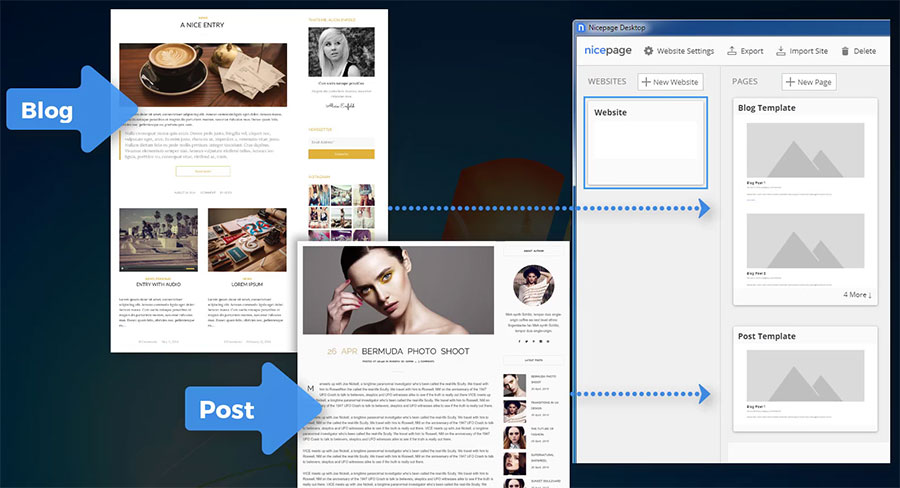
Blog and Post Templates. In the modern templates usually Blog and Post pages contain Sidebars. In a CMS these pages are output with the Blog Templates and the Post Template. Next we create a template with the Post Template containing the Sidebar in the Nicepage for Desktop. Please note that for the Post Template it is done similarly.
blog-post.jpg

Enabling Sidebar in Joomla. Run Nicepage for desktop. Select the Blog Template. Turn the Sidebar for the Blog Template clicking the left icon in the Right Panel. Switch to the Right Sidebar.

sidebar.jpg

Exporting Joomla Template. Select the Block Header and make it bold, uppercase and centered. Click Export. In the Export dialog enter the name, for example “nicepage_joomla”, then click the Export button.

export.jpg

Importing Joomla Template. Switch to the Joomla Admin. Select Extensions -> Manage -> Install. In the “Upload Package File” Tab browse for file. Select the template zip. The template is installed automatically. Click Extensions -> Templates. Make the uploaded template default.

install.jpg

Adding Joomla Modules. Select Extension -> Modules. Please note by default the Sidebar outputs the Content from the “position-sidebar” position in Joomla. Preview the website. This is the Content from the “position-sidebar” position in Joomla.

position-sidebar.jpg

Custom Joomla Positions

Using Positions. Finally, we will create a section with custom positions. It is common that the position names, are added by the template author. In Nicepage you can add custom positions to the Header, Footer, before and after a post in the Blog and Post templates.

adding-positions.jpg

Working Joomla Positions.Run the Nicepage for Desktop. Open the Blog template. Add a Blank section after the Header. Click the small plus to the left to add a section. The Blank section is selected by default. Click Done.

blank-sections.jpg

Adding Grid. Add a Grid with 3 columns. Click Add -> Grid. Select the 3 column style. Click Done. Resize the Grid. Align the Grid. Add Spacing. Clear the cells. Selecting a cell then press the Delete key. Add a Position to the first cell. Select the first cell. Click Add-> Position and Shortcode -> Position and Sidebar. Adjust the Grid.

grid.jpg

Working With Cells. Copy the first cell into other ones. Select the cell, the drag holding the CTRL key. Add names for the added Positions. Select Position in Cell 1. Enter “nicepage1” in the Sidebar Name field. Select Position in Cell 2. Enter “nicepage2” in the Sidebar Name field. Select Position in Cell 3. Enter “nicepage3” in the Sidebar Name field.

naming-poitions.jpg

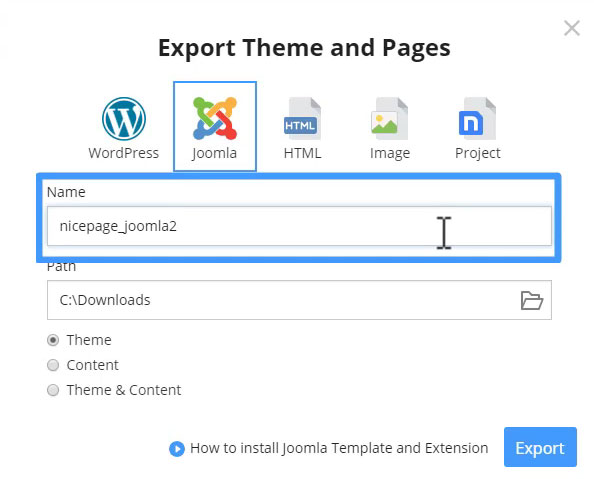
Exporting Joomla Theme. Export the theme. In the Export dialog enter the Name, for example “nicepage_joomla2” Name. Click Export.

Importing Joomla Theme. Switch to Joomla Admin. Select Extensions -> Manage -> Install. In the “Upload Package File” Tab browse for file. Select the template zip. The template is installed automatically. Click Extensions -> Templates. Make the uploaded template default.
export2.jpg

Creating Joomla Modules. Click Extensions -> Modules. We will add 3 modules and assign them the new added positions. Add a New Module. Select Custom. Enter the “Business News” Title. Select the Image. Resize the Image. Enter the Text. Select the “nicepage1” position. Click Save and Close. Add a New Module. Select Custom. Enter the “Technology Trends” Title. Select the Image. Resize the Image. Enter the Text. Select the “nicepage2” position. Click Save and Close. Add a New Module. Select Custom. Enter the “Industry News” Title. Select the Image. Resize the Image. Enter the Text. Select the “nicepage3” position. Click Save and Close.

custom-module2.jpg

Previewing Joomla Page. Preview the Page. You see the new section with 3 new positions above the post in the Blog. That’s it!

See Also

Get Started With Nicepage

Positions extend the page functionality allowing to improve the website navigation and output messages, as well as complex components including banners, sliders or social media posts. <div class="video-container"><iframe width="885" height="500" src="https://www.youtube.com/embed/I_h7RyzCAu8" frameborder="0" allow="autoplay; encrypted-media" allowfullscreen></iframe></div> ##Simple Sidebar In Joomla## **Position Support**. Nicepage fully supports the freedom of adding and moving positions. All added positions can have own styles. This demo covers three ways of using the Positions in Joomla. We start with adding a simple position inside the Nicepage Extension for Joomla. In Nicepage [Joomla Template Builder](https://nicepage.com/joomla) start with any installed template in your Joomla website. !position.jpg! **Adding Joomla Position**. Start with a Blank Page. Add a Position. Click Add -> Position and Shortcode -> Position and Sidebar. Resize the Position. Align the Position. Enter “position-sidebar” in the Joomla Position field. !postions-nicepage.jpg! **Linking Joomla Position**. Open the Modules. Select Extension -> Modules. Add a New Module. Select Custom. Enter the “Latest Updates” Title. Select the Image. Resize the Image. Enter the Text. Finally, select the “position-sidebar” position. Click Save and Close. Return to Nicepage Extension. Note this is the same position name you used in the Nicepage Extension. Click Preview. ##Adding Sidebar to Joomla Templates## **Blog and Post Templates**. In the modern templates usually Blog and Post pages contain Sidebars. In a CMS these pages are output with the Blog Templates and the Post Template. Next we create a template with the Post Template containing the Sidebar in the Nicepage for Desktop. Please note that for the Post Template it is done similarly. !blog-post.jpg! **Enabling Sidebar in Joomla**. Run Nicepage for desktop. Select the Blog Template. Turn the Sidebar for the Blog Template clicking the left icon in the Right Panel. Switch to the Right Sidebar. !sidebar.jpg! **Exporting Joomla Template**. Select the Block Header and make it bold, uppercase and centered. Click Export. In the Export dialog enter the name, for example “nicepage_joomla”, then click the Export button. !export.jpg! **Importing Joomla Template**. Switch to the Joomla Admin. Select Extensions -> Manage -> Install. In the “Upload Package File” Tab browse for file. Select the template zip. The template is installed automatically. Click Extensions -> Templates. Make the uploaded template default. !install.jpg! **Adding Joomla Modules**. Select Extension -> Modules. Please note by default the Sidebar outputs the Content from the “position-sidebar” position in Joomla. Preview the website. This is the Content from the “position-sidebar” position in Joomla. !position-sidebar.jpg! ##Custom Joomla Positions## **Using Positions**. Finally, we will create a section with custom positions. It is common that the position names, are added by the template author. In Nicepage you can add custom positions to the Header, Footer, before and after a post in the Blog and Post templates. !adding-positions.jpg! **Working Joomla Positions**.Run the Nicepage for Desktop. Open the Blog template. Add a Blank section after the Header. Click the small plus to the left to add a section. The Blank section is selected by default. Click Done. !blank-sections.jpg! **Adding Grid**. Add a Grid with 3 columns. Click Add -> Grid. Select the 3 column style. Click Done. Resize the Grid. Align the Grid. Add Spacing. Clear the cells. Selecting a cell then press the Delete key. Add a Position to the first cell. Select the first cell. Click Add-> Position and Shortcode -> Position and Sidebar. Adjust the Grid. !grid.jpg! **Working With Cells**. Copy the first cell into other ones. Select the cell, the drag holding the CTRL key. Add names for the added Positions. Select Position in Cell 1. Enter “nicepage1” in the Sidebar Name field. Select Position in Cell 2. Enter “nicepage2” in the Sidebar Name field. Select Position in Cell 3. Enter “nicepage3” in the Sidebar Name field. !naming-poitions.jpg! **Exporting Joomla Theme**. Export the theme. In the Export dialog enter the Name, for example “nicepage_joomla2” Name. Click Export. **Importing Joomla Theme**. Switch to Joomla Admin. Select Extensions -> Manage -> Install. In the “Upload Package File” Tab browse for file. Select the template zip. The template is installed automatically. Click Extensions -> Templates. Make the uploaded template default. !export2.jpg! **Creating Joomla Modules**. Click Extensions -> Modules. We will add 3 modules and assign them the new added positions. Add a New Module. Select Custom. Enter the “Business News” Title. Select the Image. Resize the Image. Enter the Text. Select the “nicepage1” position. Click Save and Close. Add a New Module. Select Custom. Enter the “Technology Trends” Title. Select the Image. Resize the Image. Enter the Text. Select the “nicepage2” position. Click Save and Close. Add a New Module. Select Custom. Enter the “Industry News” Title. Select the Image. Resize the Image. Enter the Text. Select the “nicepage3” position. Click Save and Close. !custom-module2.jpg! **Previewing Joomla Page**. Preview the Page. You see the new section with 3 new positions above the post in the Blog. That’s it! ##See Also - [Joomla Extension by Nicepage](page:1335) - [Installation of Nicepage for Joomla](page:4348) - [Joomla Menu with Nicepage](page:9928) - [Nicepage on YouTube](https://www.youtube.com/playlist?list=PLrT1zCpaZbn5Td7n67dcjue4nba8VD9hh) - [Nicepage Video Tutorials](page:1318) ## Get Started With Nicepage - [Joomla Template Builder](https://nicepage.com/joomla)