Text on colored background Landing Page


Three Checklist Stages Build Tour Confidence Before Response
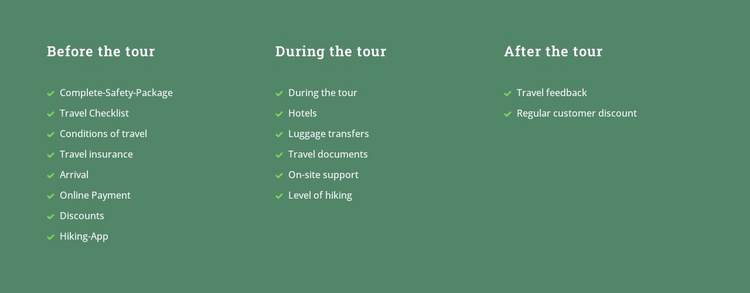
The Before the tour column can support the information stage of a landing-page sequence by organizing eight preparation topics into a quick, scannable checklist. Subjects such as travel documents, conditions of travel, insurance, arrival, and online payment give visitors practical context before they reach a later response point. Complete-Safety-Package and Travel Checklist are linked items in this first group, so they can provide direct reference paths without competing with a separate primary action elsewhere on the page.
During the tour shifts the emphasis from preparation to support through six listed topics, while After the tour closes with two topics that can reinforce continuity after the experience. The three-column structure lets visitors compare these stages at a glance, and the repeated checkmarks make each topic feel like part of an organized journey. The muted green background and light text keep the block visually unified, while bright accents help individual checklist lines remain visible. Because the block is informational and static, its strongest landing-page role is to reduce uncertainty and explain the service sequence before a distinct inquiry, booking, or other response section carries the main action.
Customize with Nicepage
Open this ready-made template in the Landing Page Builder and customize it visually in the Nicepage editor. Replace demo content, edit page sections, and adapt the design to your project without rebuilding the template from scratch.
Edit Template Offline
2. Create a new page or select existing
3. Click Add new block, search for id 2569694 and click enter
Edit Template Online
Create Awesome Websites


Free Nicepage Builder
Keywords
Build a Landing Page Around One Conversion Goal
Focus on One Primary Action
Use the landing page to guide visitors toward one measurable response, such as requesting a quote, registering, subscribing, booking a consultation, applying for a service, or submitting an inquiry. Keep the primary call-to-action consistent across the important sections so the headline, supporting content, form, and CTA buttons work toward the same campaign goal instead of competing for attention.
Capture Leads With a Form
Use the Contact Form Element to add a contact, subscription, application, or other conversion form directly to the landing page. Customize the form fields, layout, labels, inputs, and button to collect the information required for your campaign while keeping the form focused on the action you want visitors to complete.
Nicepage also provides several form submission options. Form submissions can be sent to Email, stored as Leads, added to Google Sheets, passed to a custom URL or server endpoint, or used to populate a MailChimp mailing list. This provides practical options for collecting inquiries, registrations, subscriptions, applications, and other campaign responses.
Manage Leads and Campaign Responses
When submissions are stored as Leads, you can use Contact Form Leads to review the information collected through the landing page and use it for follow-up. Keep the form connected to the same offer and primary CTA presented throughout the page so visitors move from the campaign message to a clear conversion action.
This workflow makes the template suitable for landing pages where the offer, content, call-to-action, form, and lead collection process work together toward one defined conversion goal.