Overview

We will show how to design this web page in minutes. It may become your secret to be steps ahead in the industry. You will be able to present stories, products, and services fast, in minutes.

Researches show that there are only 8 seconds to impress visitors with the design. We will demonstrate this using the example. The traditional way you see to the left, it's a mockup drawn in Adobe Photoshop. We'll show you the new way!

Theme Settings

Adding New Website. Add a new website with a new page. We start with the Theme Settings. Theme Settings customize the website's colors, fonts, and typography. These styles will be used for all text elements on the web page. It is very convenient and looks nice!

Chooosing Colors. In the mockup, we see that two colors, besides black and white, are used throughout the page. We will add those colors to the Palette. Select Theme -> Colors. We will modify the current Pallete. Use the color picker to select the Color. Copy the Color value. Paste this value into the Color 1 field. Add the second Color similarly. Use a color picker. Copy the value. Paste this value into the Color 2 field.

colors.png

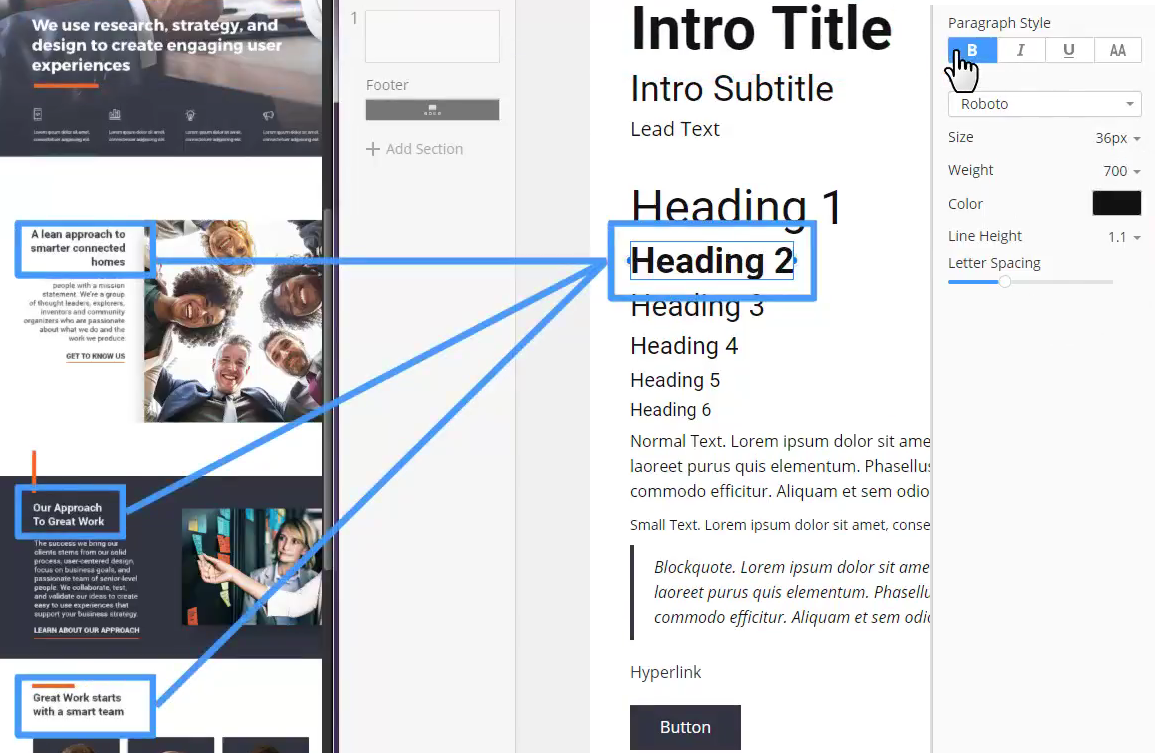
Chooosing Fonts. Proceed to the Fonts. We will use the Font Scheme, and the Typography set by default and do the fine-tuning. Select Theme -> Headings and Texts. Modify the Headings, Text, and Hyperlinks. Later, by adding these elements to blocks, the styles you set will be applied automatically.

Modifying Hyperlinks. For the Hyperlink, there is an orange underline. Set the width and the Color of this Line. The orange used for the Line has been added in Colors earlier. Note that this Hyperlink style will be used for all hyperlinks on this web page.

Headings and Text. Setting Headings and Text styles helps to apply the right styles in one click. It makes the page look solid, consistent, and beautiful. And Nicepage HTML Website Builder saves time a lot!

headings.png

We have finished with the Theme. Now we are proceeding to blocks, the main building blocks of Modern Web Design.

Intro Block

Replacing images. The first Block was added by default to the page. We will use it for the Introduction. Let's start. Increase the Block Height. Change the Color Fill to Image Fill for the Block in the Right Panel. Replace the Image for the background by dragging another from your local folder.

Using Box. For the texts, we'll use a Box. Boxes help the group move and align all nested elements at once. Also, the group can have a common background for all elements if needed. To add a Box, select Add Panel -> Box. Later, you can use the "Alt + B" hotkey to add сontainers much faster.

container.png

Adding Texts. Move the Box left. Increase the width. Add a Title, select Add-> Text -> Title. Add a Line, select Add -> Line. Make the Title white. Modify the Title text. Please note that the style applied to the Title has been set previously in the Theme -> Headings and Texts.

intro-1.png

Modifying the Line. As you see in the mockup, the Line should be orange. Also, make the Line thicker and shorter. As a reminder, the orange was set in Theme -> Colors. Align the whole block bottom. We see feature icons with texts below the Title.

Adding Grid

Modifying the Grid. The easiest way to add a row of similar text blocks is to use a Grid. Select Add -> Grid. There are over a hundred Grid layouts available. Select a Grid with four cells. In addition, grids are very useful for the responsive modes, as, for smaller screens, cells are reorganized automatically. Shrink the Grid Height. Align the Grid Left.

grid.png

Guidelines. Make the Grid Sheet-wide. Increase spacing between the cells. While moving and aligning, you see the red lines. Those are the guides that help to snap controls to Boxes, Blocks, and each other.

Editing the Content. Delete the cell content. Select the first Cell, and press the Delete key. Add an Icon. Press the "I" hotkey to open the dialog. In the dialog, type "Phone" in the search field. Select a Linear Phone icon. Press the "T" hotkey to add a text. Delete the last two lines of the Text added by default. Now we will copy the Cell to make all cells consistent. To copy, drag the Cell over another, holding the CTRL key.

copy.png

Working with Icons. Replace the icon in the second sell. Search for a "Graph" icon. For the third Cell, replace it with the "Idea" icon, and select a Light Bulb. For the fourth, use the "Alarm" keyword, and select a Linear Bell. The first Introduction Block is ready. Isn't that simple?

icons.png

Split Block

Adding the Grid. Let's add the second Block. Add a blank Block. Increase the BlockHeight. We see that visually the content of this Block is divided into two parts. The best, in this case, is also to use a grid. Select Add -> Grid. Add a Grid with 2 cells.

grid-layout.png

Change the height of the Grid. Make the right Cell bigger. Fix the Alignment of the Grid. Again, the red lines and the snapping guides are very helpful. Select the right Cell. Collapse the Image. Resize the Image. Guides help to snap to the center.

Modifying the Image. Replace the Image by dragging another from your local folder. Enable "Shadow" n the Right Panel. Select a Shadow Preset. Customize the Shadow. Modify Blur and Transparency.

image.png

Adding Texts. Select the left Cell. Press the DELETE key to clear the Cell. Press " to add a line. Press " to add Heading 2. Press T to add a text and H to add a Hyperlink. Make the line orange, thicker, and shorter. Modify the Heading. Add more Text. Change the Hyperlink text. Align the content in the left Cell by pressing the align options in the Right Panel. This Block is also finished.

Block With Overlapping

Mofifying the Cell. Add a Blank Block. Change the background color to Color 1 set in the Theme Settings. Increase the BlockHeight. Add a grid with two cells like for the previous Block. Shrink the Grid Height. Make the right Cell bigger.

Adding the Content. Replace the Image in the right Cell by dragging another image from your local folder. Select the left Cell, then press the DELETE key. Press " to add a line. Press " to add Heading 2. Press T to add a text. Press " to add a Hyperlink. Make the Hyperlink underline orange.

Overlap Making. Make the Line above the Heading also orange, thicker, and shorter. Turn the Line 90 degrees to the top. You see, the Line now overlaps the previous Blocks. To do overlapping has never been easier!

overlapping.png

Mofifying Texts. Modify the Heading Text. Add more Text. Lastly, modify the Hyperlink text.

Block with Columns

Adding the Grid. Proceed to the Team Block. Despite the many pre-designed Team Blocks, we will also do this Block from scratch. Add a Blank Block. Increase the Block Height. Add a grid with three cells. Change the Grid height. Move the Grid up. Guides are handy again. Add spacing between the cells.

grid-3.png

Modifying the Image. Select the first Cell and collapse the background image. The Image became a part of the cell content. Resize the Image snapping to the Cell, left and right. Leave space below the Image for the Name and the Text.

Modifying the Content. Enable the Fill for this Cell in the right Panel. Change the Color to light gray. Press to add Heading 4 for the Name and T for the Text. Remove the extra Text. and Enter a Name. Move the Name and the Text down. While moving red, guides and sizes in boxes help to align.

Copying Cells. Slightly increase the height of the Image. Replace the Image with another one from your local folder. To keep cells consistent, copy the first Cell into the other two. Replace the images. Modify names. Now we will add a title for this Block above the Grid. In the mockup, we see the Heading and the Line.

copy-cells.png

Using Box. To group these elements, we will use a Box. We have already used a Box to group elements in the first Intro Block.

container-line.png

Press Alt + B to add a Box. Resize the Box. Press " to add a line. Press " to add Heading 2 for the Block Title. Modify the Heading 2. Make the line orange, thicker and shorter. Align the content vertically. The page is ready. WWasn'tthat fast?!

Responsive Preview

Mobile Views. Click the Preview to the right of the Top Bar. And now, hhe'sthe Magic! Clicking the Responsive Mode icons, you see that the page looks NICE in all modes. It was all done automatically!

responsive.png

See Also

Get Started With Nicepage

## Overview We will show how to design this web page in minutes. It may become your secret to be steps ahead in the industry. You will be able to present stories, products, and services fast, in minutes. ## <div class="video-container"><iframe width="885" height="500" src="//www.youtube.com/embed/rGBiRF7UAQc?rel=0" frameborder="0" allowfullscreen></iframe></div> ## Researches show that there are only 8 seconds to impress visitors with the design. We will demonstrate this using the example. The traditional way you see to the left, it's a mockup drawn in Adobe Photoshop. We'll show you the new way! ## Theme Settings **Adding New Website**. Add a new website with a new page. We start with the Theme Settings. Theme Settings customize the website's colors, fonts, and typography. These styles will be used for all text elements on the web page. It is very convenient and looks nice! **Chooosing Colors**. In the mockup, we see that two colors, besides black and white, are used throughout the page. We will add those colors to the Palette. Select Theme -> Colors. We will modify the current Pallete. Use the color picker to select the Color. Copy the Color value. Paste this value into the Color 1 field. Add the second Color similarly. Use a color picker. Copy the value. Paste this value into the Color 2 field. !colors.png! **Chooosing Fonts**. Proceed to the Fonts. We will use the Font Scheme, and the Typography set by default and do the fine-tuning. Select Theme -> Headings and Texts. Modify the Headings, Text, and Hyperlinks. Later, by adding these elements to blocks, the styles you set will be applied automatically. **Modifying Hyperlinks**. For the Hyperlink, there is an orange underline. Set the width and the Color of this Line. The orange used for the Line has been added in Colors earlier. Note that this Hyperlink style will be used for all hyperlinks on this web page. **Headings and Text**. Setting Headings and Text styles helps to apply the right styles in one click. It makes the page look solid, consistent, and beautiful. And Nicepage [HTML Website Builder](https://nicepage.com/html) saves time a lot! !headings.png! We have finished with the Theme. Now we are proceeding to blocks, the main building blocks of Modern Web Design. ## Intro Block **Replacing images**. The first Block was added by default to the page. We will use it for the Introduction. Let's start. Increase the Block Height. Change the Color Fill to Image Fill for the Block in the Right Panel. Replace the Image for the background by dragging another from your local folder. **Using Box**. For the texts, we'll use a Box. Boxes help the group move and align all nested elements at once. Also, the group can have a common background for all elements if needed. To add a Box, select Add Panel -> Box. Later, you can use the "Alt + B" hotkey to add сontainers much faster. !container.png! **Adding Texts**. Move the Box left. Increase the width. Add a Title, select Add-> Text -> Title. Add a Line, select Add -> Line. Make the Title white. Modify the Title text. Please note that the style applied to the Title has been set previously in the Theme -> Headings and Texts. !intro-1.png! **Modifying the Line**. As you see in the mockup, the Line should be orange. Also, make the Line thicker and shorter. As a reminder, the orange was set in Theme -> Colors. Align the whole block bottom. We see feature icons with texts below the Title. ##Adding Grid## **Modifying the Grid**. The easiest way to add a row of similar text blocks is to use a Grid. Select Add -> Grid. There are over a hundred Grid layouts available. Select a Grid with four cells. In addition, grids are very useful for the responsive modes, as, for smaller screens, cells are reorganized automatically. Shrink the Grid Height. Align the Grid Left. !grid.png! **Guidelines**. Make the Grid Sheet-wide. Increase spacing between the cells. While moving and aligning, you see the red lines. Those are the guides that help to snap controls to Boxes, Blocks, and each other. **Editing the Content**. Delete the cell content. Select the first Cell, and press the Delete key. Add an Icon. Press the "I" hotkey to open the dialog. In the dialog, type "Phone" in the search field. Select a Linear Phone icon. Press the "T" hotkey to add a text. Delete the last two lines of the Text added by default. Now we will copy the Cell to make all cells consistent. To copy, drag the Cell over another, holding the CTRL key. !copy.png! **Working with Icons**. Replace the icon in the second sell. Search for a "Graph" icon. For the third Cell, replace it with the "Idea" icon, and select a Light Bulb. For the fourth, use the "Alarm" keyword, and select a Linear Bell. The first Introduction Block is ready. Isn't that simple? !icons.png! ## Split Block **Adding the Grid**. Let's add the second Block. Add a blank Block. Increase the BlockHeight. We see that visually the content of this Block is divided into two parts. The best, in this case, is also to use a grid. Select Add -> Grid. Add a Grid with 2 cells. !grid-layout.png! Change the height of the Grid. Make the right Cell bigger. Fix the Alignment of the Grid. Again, the red lines and the snapping guides are very helpful. Select the right Cell. Collapse the Image. Resize the Image. Guides help to snap to the center. **Modifying the Image**. Replace the Image by dragging another from your local folder. Enable "Shadow" n the Right Panel. Select a Shadow Preset. Customize the Shadow. Modify Blur and Transparency. !image.png! **Adding Texts**. Select the left Cell. Press the DELETE key to clear the Cell. Press " to add a line. Press " to add Heading 2. Press T to add a text and H to add a Hyperlink. Make the line orange, thicker, and shorter. Modify the Heading. Add more Text. Change the Hyperlink text. Align the content in the left Cell by pressing the align options in the Right Panel. This Block is also finished. ## Block With Overlapping **Mofifying the Cell**. Add a Blank Block. Change the background color to Color 1 set in the Theme Settings. Increase the BlockHeight. Add a grid with two cells like for the previous Block. Shrink the Grid Height. Make the right Cell bigger. **Adding the Content**. Replace the Image in the right Cell by dragging another image from your local folder. Select the left Cell, then press the DELETE key. Press " to add a line. Press " to add Heading 2. Press T to add a text. Press " to add a Hyperlink. Make the Hyperlink underline orange. **Overlap Making**. Make the Line above the Heading also orange, thicker, and shorter. Turn the Line 90 degrees to the top. You see, the Line now overlaps the previous Blocks. To do overlapping has never been easier! !overlapping.png! **Mofifying Texts**. Modify the Heading Text. Add more Text. Lastly, modify the Hyperlink text. ##Block with Columns## **Adding the Grid**. Proceed to the Team Block. Despite the many pre-designed Team Blocks, we will also do this Block from scratch. Add a Blank Block. Increase the Block Height. Add a grid with three cells. Change the Grid height. Move the Grid up. Guides are handy again. Add spacing between the cells. !grid-3.png! **Modifying the Image**. Select the first Cell and collapse the background image. The Image became a part of the cell content. Resize the Image snapping to the Cell, left and right. Leave space below the Image for the Name and the Text. **Modifying the Content**. Enable the Fill for this Cell in the right Panel. Change the Color to light gray. Press to add Heading 4 for the Name and T for the Text. Remove the extra Text. and Enter a Name. Move the Name and the Text down. While moving red, guides and sizes in boxes help to align. **Copying Cells**. Slightly increase the height of the Image. Replace the Image with another one from your local folder. To keep cells consistent, copy the first Cell into the other two. Replace the images. Modify names. Now we will add a title for this Block above the Grid. In the mockup, we see the Heading and the Line. !copy-cells.png! **Using Box**. To group these elements, we will use a Box. We have already used a Box to group elements in the first Intro Block. !container-line.png! Press Alt + B to add a Box. Resize the Box. Press " to add a line. Press " to add Heading 2 for the Block Title. Modify the Heading 2. Make the line orange, thicker and shorter. Align the content vertically. The page is ready. WWasn'tthat fast?! ##Responsive Preview## **Mobile Views**. Click the Preview to the right of the Top Bar. And now, hhe'sthe Magic! Clicking the Responsive Mode icons, you see that the page looks NICE in all modes. It was all done automatically! !responsive.png! ##See Also - [Making Travel Website](page:1317) - [Nicepage on YouTube](https://www.youtube.com/playlist?list=PLrT1zCpaZbn5Td7n67dcjue4nba8VD9hh) - [Nicepage Video Tutorials](page:1318) ## Get Started With Nicepage - [HTML Website Builder](https://nicepage.com/html)