Cómo utilizar el elemento Cuenta atrás en su sitio web

Preajustes de cuenta regresiva en el menú Agregar
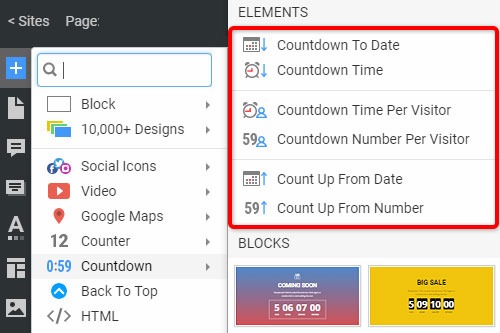
Click the Add Menu and scroll down to the Countdown section. There are Countdown Presets, which you can use to insert the initially predefined set of the Element quickly. The Presets include the Countdown To Date, Countdown To Time, Countdown To Time Per Visitor, Countdown To Number Per Visitor, Count Up from Date, Count up From Number.
Formato de cuenta regresiva
Puede cambiar el formato de cuenta regresiva según sus necesidades de marketing. Puede ser Fecha, Hora y Número. Seleccione el Elemento de cuenta atrás, vaya al Panel de propiedades y haga clic en los iconos correspondientes en la sección Formato para cambiar el Formato de cuenta atrás.
Dirección de cuenta regresiva
La cuenta regresiva en un sitio web puede mostrar la cifra ascendente o descendente, lo que permite a los visitantes estimar el plazo hasta o desde la fecha, hora o número especificado. Para establecer la Dirección, seleccione el Elemento de cuenta regresiva en un Bloque, luego cambie la propiedad Dirección en el Panel de propiedades.
Separador de cuenta regresiva
Puede seleccionar el aspecto del separador de cuenta regresiva que puede ser de dos puntos, puntos, guiones o ninguno. Haga clic en el elemento de cuenta regresiva en su Bloque web, luego vaya a la propiedad correspondiente en el Panel de propiedades. Haga clic en los iconos para cambiar el separador entre los elementos de la cuenta regresiva.
Cuenta regresiva después de la acción de conteo
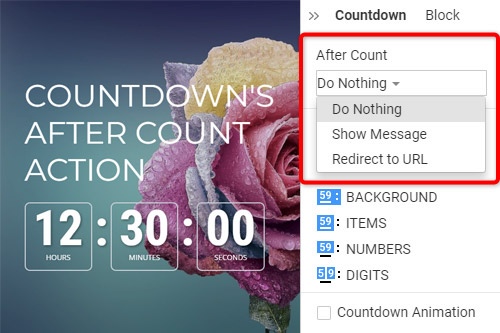
Si utiliza el elemento de cuenta regresiva en su sitio web, puede especificar la acción que se realizará después del tiempo de conteo, como "No hacer nada", "Mostrar mensaje" o "Redirigir URL". Para configurar la acción, seleccione la cuenta regresiva en un bloque, vaya al Panel de propiedades, luego seleccione la acción en la sección Después de la cuenta. Tenga en cuenta que After Count está disponible solo si la dirección de cuenta regresiva está configurada en Abajo.
Cuenta regresiva después del mensaje de conteo
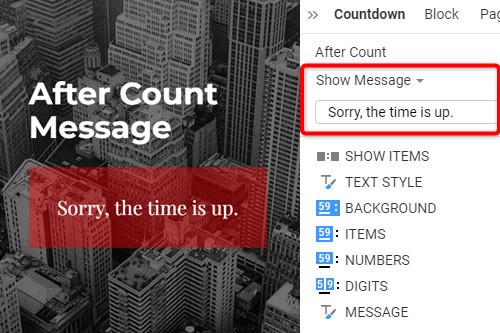
Para el elemento de cuenta regresiva en su sitio web, puede ingresar el texto que se mostrará después del conteo. Seleccione la Cuenta regresiva, vaya al Panel de propiedades y seleccione la opción Mostrar mensaje en la sección Después de la cuenta. De forma predeterminada, hay un texto que puede dejar tal cual o editar si es necesario. Este mensaje lo verás después de que termine la cuenta regresiva.
Estilo de cuenta regresiva
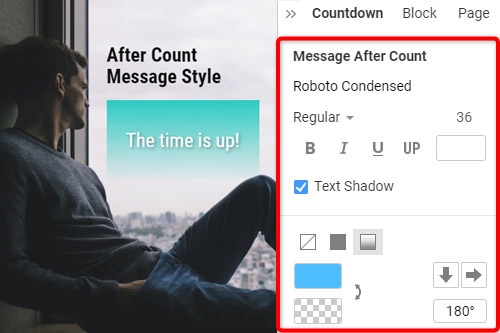
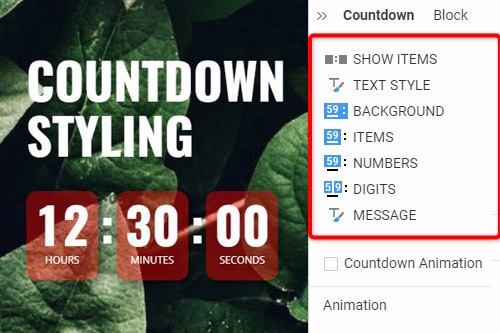
El elemento de cuenta regresiva consta de varios componentes, incluidos el fondo, los elementos, los números y los dígitos, en los que puede modificar el relleno, el color, el borde, etc. Además, puede cambiar la propiedad Mostrar elementos y estilizar el texto y el mensaje. . Seleccione el Elemento de cuenta regresiva, vaya al Panel de propiedades, haga clic en los enlaces para acceder a los Paneles correspondientes para editar los componentes de Cuenta regresiva.
Animación de cuenta regresiva
Puede mostrar la animación suave para el cambio de dígitos. Para eso, seleccione el elemento de cuenta regresiva. En el Panel de propiedades, vaya a la propiedad Animación de cuenta regresiva. Haga clic en la casilla de verificación para habilitar la animación. Obtenga una vista previa de la página para ver la animación real aplicada a la cuenta regresiva.
Temporizador de cuenta atrás
El Countup es el Elemento opuesto al Countdown que añade un contador que cuenta desde un número hacia arriba. Puede usar Countup como una forma inteligente de presentar información estadística sobre fechas, horas, cantidad de visitantes, tiempos de descarga, ventas de productos, crecimiento de existencias y más.
How To Use The Countdown Element On Your Website
Create a sense of urgency and build a birthday Countdown clock on your website. Social media and trade sense of urgency (customers are very sensitive when we talk about time) is a very important technique to realize this sense with a countdown widget. A countdown timer will help you create a nice website with powerful effects. You can create a pretty animated countdown clock to use to share or embed on your site. Many websites use a countdown clock to make the coming soon page, which has many features. With countdown timer Ultimate it is possible to create as many timers of the countdown as you want for different purposes, and to some degree customize their look and feel. So, add a countdown timer on your page, and enhance the website with this nice feature. Add a countdown timer widget and take advantage of your competitors.
Like the WordPress theme, our countdown section of the add menu has the presets for the quick insert of the preliminary preset Element, which includes Countdown To Date, Countdown To Time, Countdown To Time Per Visitor, and so on. By the way, the countdown clock is a very useful tool for the online store, Pop-Ups, form builder apps, etc. Countdown widget for the sites allows them to display how the goods are sold out right in front of their customers. You can easily create the best countdown timer and use it for your website. It is one of the most popular widgets for modern websites. You can change the Count Down format from the properties like the WordPress countdown timer. Build the countdown timer for the website with Nicepage, add the countdown clock on the landing page, and this animation will make your layout more attractive for users.
For the Date, Time, and Number Countdown Types, you can create a countdown timer item without a need to embed code, and then set the Count For property either for Everyone or Per Visitor. In the countdown timer widget, you can find separate properties for the Number figure. You can specify Fill, Border, and Padding separately for Numbers, making Countdown styling more flexible. Besides the counting down menu, you can find the Hover slider options in the Add Menu. It is the group with the enabled hover slide. Add countdown timers, and if the Per Visitor is selected, Countdown starts from the beginning for each new Visitor. Read terms of service, sign up free, and start using our editor. Like the image sliders, countdown timers are completely customizable and shareable for social media feeds. Like the WordPress countdown timer, our widget enables us to specify the direction to go up or down. It is possible to set the countdown mode to everyone or per Visitor. Communication techniques for creating a sense of urgency make the client trust that there is no time to doubt.
