There are two ways to put fields in a row.
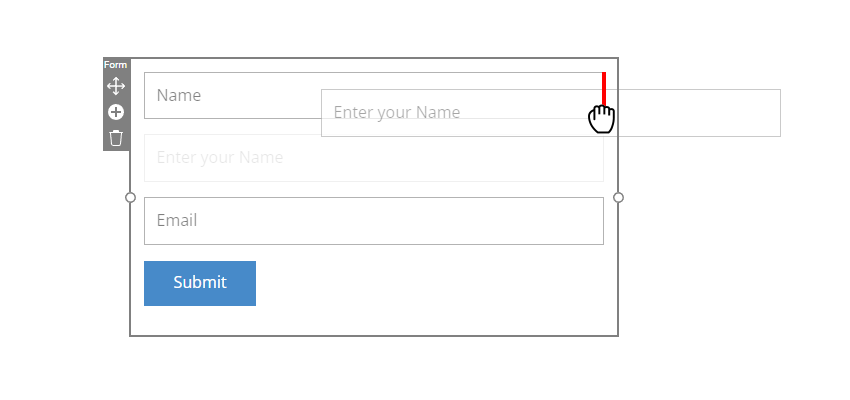
You can drag from fields, placing them one after another if you need them to be more compact. It is good, for example, for multiple names or addresses.
- Add an Input field to the form after the existing Input.
- Drag it over the existing one until you see the red border.
- Drop it on the red border.
- You should have two Inputs in a row.
- Repeat if you need more fields in one row.

Change Layout
After adding a contact form, go to the Property Panel and change the Layout to Horizontal.

There are two ways to put fields in a row.
## Drag Form Fields
You can drag from fields, placing them one after another if you need them to be more compact. It is good, for example, for multiple names or addresses.
1. Add an Input field to the form after the existing Input.
2. Drag it over the existing one until you see the red border.
3. Drop it on the red border.
4. You should have two Inputs in a row.
5. Repeat if you need more fields in one row.
<a href="https://resources.nicepage.com/919/139919/fields-row-drag.png" target="_blank"><img src="https://resources.nicepage.com/919/139919/fields-row-drag.png" width="300" style="margin: 20px 0"></a>
## Change Layout
After adding a contact form, go to the Property Panel and change the Layout to Horizontal.
<a href="https://resources.nicepage.com/920/139920/fields-row-layout.png" target="_blank"><img src="https://resources.nicepage.com/920/139920/fields-row-layout.png" width="300" style="margin: 20px 0"></a>
## Related
- [Conact Form Element](page:98378)
- [Contact Form Field Types](page:333311)
- [Contact Form Calculation Field](page:333764)
- [Contact Form Conditions](page:340748)
- [Contact Form File Upload](page:279718)
- [Multi-Step Contact Form](page:364596)
- [Contact Form Step Progress](page:395984)
##


