Bir web sayfası oluştururken Tablo öğesi nasıl kullanılır?


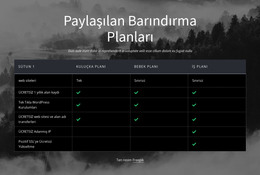
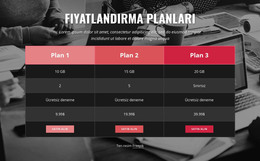
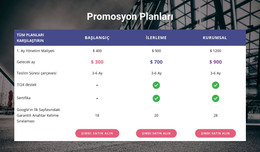
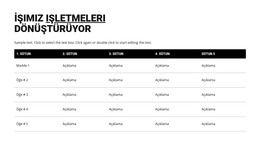
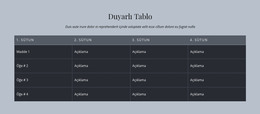
Masa Blok Tasarımları
Ayrıca Tablo öğesiyle kolayca başlayabilirsiniz. Ve Table öğesini içeren tasarımcı yapımı blokları kullanabilirsiniz. Hızlı Erişim Çubuğunda Ekle simgesine tıklayın, Tablo bölümüne gidin, Tabloyu seçin ve açılan panelde herhangi bir Tablo tasarımını seçin.
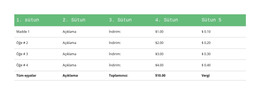
Tablo Sütunları ve Satırları
Sütunları ve satırları olan diğer herhangi bir öğeye benzer şekilde, seçilen Tablo öğesi için Özellik Panelinde karşılık gelen kaydırıcıları sürükleyerek Tablonun Sütun ve Satırlarının sayısını değiştirebilirsiniz.

Masa Şekillendirme
Web tasarımında popüler olan Nicepage'deki tüm bileşik öğeler gibi, Tabloyu düzeninize göre stilize edebilirsiniz. Bir Bloktaki Tablo öğesini tıklayın. Sağdaki Özellik Paneline gidin ve ilgili Tablo özelliklerini değiştirmek üzere panellere gitmek için bölüm bağlantılarına tıklayın.
Tablo Taşıma Sütunları ve Satırları
Seçili Tablo öğesindeki Sütunları ve Satırları yönetebilirsiniz. Ardından, seçmek için Bloğunuzdaki Tabloya tıklayın. Sütunları sola ve sağa ve Satırları yukarı ve aşağı taşımak için farenin sağ tıklama menüsündeki Taşı seçeneğine veya Bağlam Paneli daha fazla seçenek simgesine tıklayın.
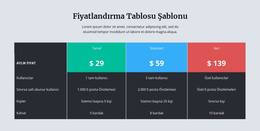
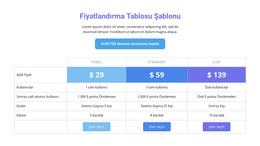
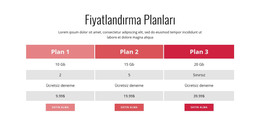
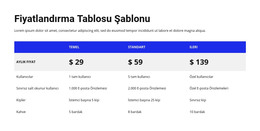
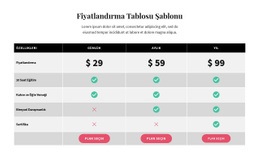
Tablo Elemanı ile Ücretsiz Şablonlar
Her işletme için harika olan en iyi şablonlarımızla başlayın. Bunları, kod gerektirmeyen güçlü ve ücretsiz web sitesi oluşturucumuzla oluşturun ve özelleştirin. Tüm şablonlar mobil uyumludur ve her cihazda mükemmel görünür.
-

-
-
-
-
-
-
-
-
-
-
-
-
-
-
-
-
-
-
-
-
-
-
-
-
-
-
-
-
-
-
Herhangi Bir Şablonu Özelleştirinİndir
-
-
-
-
-
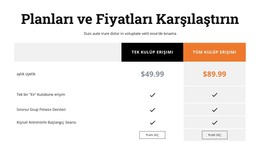
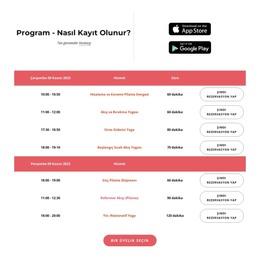

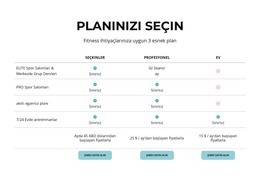


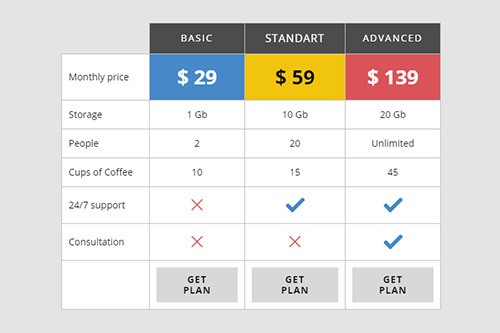
How To Create Tables For Your Nicepage Website?
During the building of your site, you may require to create tables for various purposes. If you want to create a new table similar to the HTML Table Element, you must first decide how many columns & rows you will be using and what information you will present in them. Create new tables with blog post hyperlinks, modify table rows and columns with social media tools, or integrate as many columns and rows as you need using our program. So how the columns and rows are arranged and the number of columns & rows changed using the simple toolkit of our program?
Log in to your account using your email address or accounts in google or Facebook. Open the Add Elements, and select on the Table Element. The new table will appear on your page layout, and on the right side of it, you will see the panel, where all customization of your current and future new tables will occur. At any moment, you can add the required number of columns and rows in the table by dragging the slider table element below the columns and rows back and forth or manually by clicking on the responsive tables themselves to add new cells. Pick the different background colors for rows and columns using simple background color shading or the complex one combined with two colors to stress certain table data.
How to create a table with new drag and drop elements, and how do elements in your table element make it unique? Create responsive tables and quickly add the image element you want to the table header by clicking the star icon above the cell you want to customize. Like the HTML table and image elements, you can add a hyperlink to your blog post, email address, terms of service, or the contact form to the footer. If the table is too big, add the skip to content button to concentrate the visitor on the important content. Add a star rating element if you create new table data or modify an existing table for an online store or table data about various products or services quality with a blog post as proof. As an example of how you can create tables with a star rating, create a new table element, select a flashy background table header with the title name and decide how many stores or products you will review. Every store is placed on a separate table row, all information about the store, including a phone number, is provided in the first column, its blog post on a certain topic the second or third, and the rating is placed in the last column.