Summary
- Overview
- General Tab
- SEO Tab
- Google Tab
- HTML Tab
- CSS Tab
- Cookies Tab
- Theme Tab
- White Label Tab
- Client License Tab
Overview
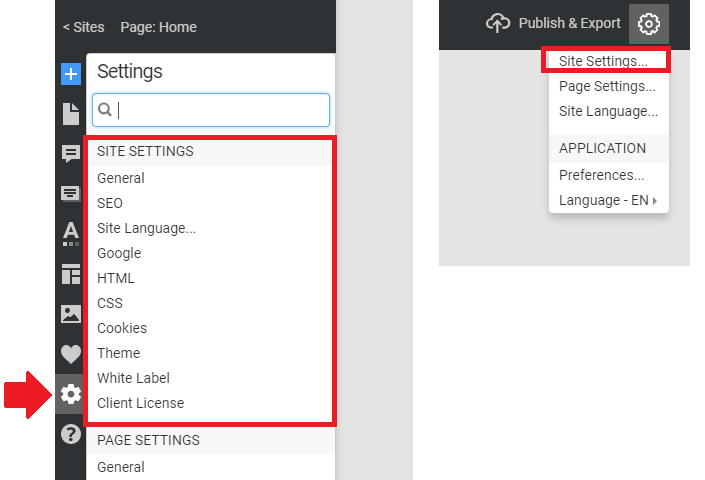
You can edit the global settings of your website in the Site Settings. On the Dashboard, open the Site Settings by clicking the Top Bar button.
You can also open the Site Settings by clicking the Settings Icon on the Top Bar and from the Quick Access Settings Panels.
General Tab
Open the General Tab to set the General Settings for your Site.
Site Title
Specify the Site Title name and identify the Site's location on the web.
Web Address
Specify the Web Address by entering the Subdomain Name for your Site published to the Nicepage network.
Custom Domain
Assign a Custom Domain to point to a Subdomain of the Nicepage network in the General Tab of the Site Settings.
Create SEO-Friendly Links (without .html)
You can make the SEO-Frienfly URLs while publishing sites to Nicepage, as you can generate the links without the .html extension by checking the Create Links without .html checkbox.
Home Page
Set the Home Page for your Site to be open by default while going to its URL. By default, this setting is set to Home.
Favicon
Upload a small icon, 16 x 16 pixels, for your Site to be shown in the browser tab before the Website Title.
Footer Message
You can disable the "Made in Nicepage" message at the bottom of all pages, which is available only for users with the Premium Plans.
SEO Tab
The settings of the SEO Tab are placed into the parameters of the corresponding meta tags of the HEAD HTML tag at the top of the generated Website code.
Language
Select the Language for your Site. This setting is set to English by default.
Country
You can also specify the Country of your Site.
Default Keywords
Specify the Default Keywords and Phrases to enable users to find your Site via search engines. These Keywords are put into the content parameter for the KEYWORDS meta tag and must be separated with a comma.
<meta name="keywords" content=">
Default Description
Add a short paragraph of Default Description text describing your Website content. The search results show This text under the Website or Page URL. This text is put into the DESCRIPTION meta tag.
<meta name="description" content=">
Image Lazy Loading
Enable the Image Lazy Loading, allowing you to load the Website images gradually while scrolling a web page. It decreases the web page's loading speed since the Website images are not loaded all at once, and it is recommended for good SEO.
Disable Open Graph
You can enable the Disable Open Graph option in the SEO Tab of the Site Settings if you set the Open Graph properties in any external plugin.
Google Tab
Use the Google tab of the Site Settings to assign your Site to supported Google Services.
Google Analytics ID
Enter your Google Analytics ID to assign your Site to the Google Analytics account and get your Site statistics. Read more about how to set up Google Analytics.
Google Tag Manager
Enter the Container ID for your Google Tag Manager, a popular tag management system that allows you to update measurement codes and related code fragments quickly. Read more about how to set up and install Tag Manager.
Google Optimize Container
Use the Container ID to access your Google Optimize Сontainer settings that control each Container's email notifications, users, and accounts. Read more about editing Optimize Container settings.
reCaptcha Site Key
The reCaptcha Site Key invokes the service on your Site. Learn more about the reCAPTCHA Integration.
reCaptcha Secret Key
The reCaptcha Secret Key authorizes communication between the Site and the reCaptcha server to verify the submitter response. It would be best to keep the Secret Key safe for security purposes.
NOTE: The Security Key is required if you set the Site Key in the Site Settings. And if you do not enter it, you will see the Warning. For proper functioning, both ReCaptcha keys must be specified.
Read more about how to use the Google reCAPTCHA.
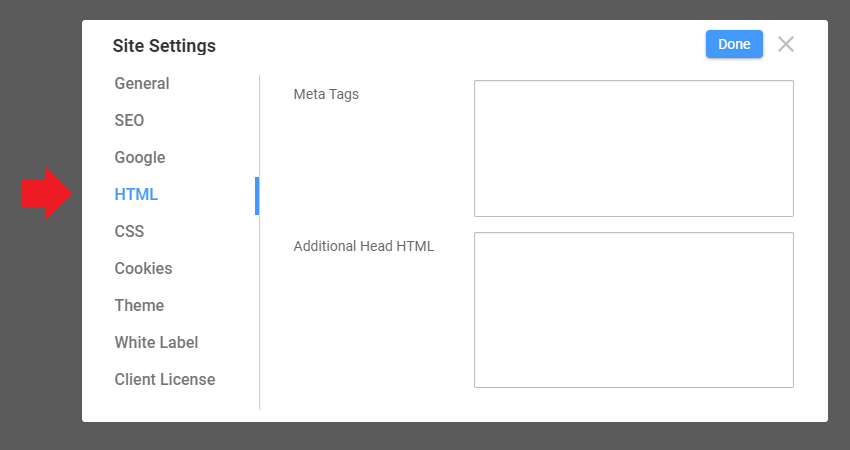
HTML Tab
Meta Tags
Use the Meta Tags field to add other meta tags you want included, like "author," "contact," etc.
Additional Head HTML
Place the custom HTML HEAD elements. They will be added to the HEAD section of each Site page.
CSS Tab
Use the Additional CSS area to insert custom CSS code in the CSS Tab. The code will be added to the exported project stylesheet.
Cookie Tab
Use the Cookie Tab to edit the settings of the Cookies Privacy Popup on sites.
Show On All Pages
Check the Show On All Pages if you want to show the Cookies Privacy Popup on all the Site's pages, unlike on the home page.
Edit Template Button
Click on the Edit Template to quickly access the Cookies Privacy Popup in the Theme Settings.
Run Script After Cookie Acceptance
You can also enter the script to be run after clicking the Cookie Consent button on a site.
Embed Google Fonts
Due to the General Data Protection Regulation (GDPR) of the European Union, the sites must Embed Google Fonts and not transfer any user information to third parties, including Google.
Theme Tab
You can use Nicepage to create themes and templates for WordPress and Joomla. Therefore, you must specify theme information, which you can do in the Theme Tab of the Site Settings.
Button To Theme Settings
You can open the Theme Settings by clicking the Theme Settings button in the Theme Tab.
Theme Information
You can specify the Author, Author URL, Version, Theme URL, Tags, Description, and Generator for your Site's WordPress Theme or Joomla Template.
Theme Thumbnail
Some CMS, like WordPress, require a Thumbnail to be shown in the Templates section. The themes show the default image if you do not upload another one.
White Label Tab
NOTE: To use the White Label Tab, you MUST HAVE the Ultimate license. Read more about the White Label.
You can use the White Label Tab to enter your branding information for the Nicepage WordPress Plugin or Joomla Extension.
Branding Information
Specify the Title, Author, Author URL, and Description for your branded WordPress Plugin or Joomla Extension.
Branding Logos
Enter the Small Logo on the WordPress sidebar and the Big Logo for the WordPress Plugins.
Client License Tab
The Pro and Ultimate users can specify whether to allow editing of the site layout.
![site-settings-client-license.png]()
## Summary
- Overview
- General Tab
- SEO Tab
- Google Tab
- HTML Tab
- CSS Tab
- Cookies Tab
- Theme Tab
- White Label Tab
- Client License Tab
## Overview
You can edit the global settings of your website in the **Site Settings**. On the **Dashboard**, open the **Site Settings** by clicking the Top Bar button.
!site-settings-dashboard.png!
You can also open the **Site Settings** by clicking the Settings Icon on the Top Bar and from the Quick Access Settings Panels.
!site-settings-editor.png!
## General Tab
Open the **General Tab** to set the General Settings for your Site.
!site-settings-general.png!
### Site Title
Specify the **Site Title** name and identify the Site's location on the web.
### Web Address
Specify the **Web Address** by entering the **Subdomain Name** for your Site published to the Nicepage network.
### Custom Domain
Assign a [Custom Domain](page:1293) to point to a Subdomain of the Nicepage network in the General Tab of the Site Settings.
!site-settings-custom-domain.png!
### Create SEO-Friendly Links (without .html)
You can make the **SEO-Frienfly URLs** while publishing sites to Nicepage, as you can generate the links without the .html extension by checking the **Create Links without .html** checkbox.
!create-links-without-html.png!
### Home Page
Set the **Home Page** for your Site to be open by default while going to its URL. By default, this setting is set to **Home**.
### Favicon
Upload a small icon, 16 x 16 pixels, for your Site to be shown in the browser tab before the Website Title.
### Footer Message
You can disable the **"Made in Nicepage"** message at the bottom of all pages, which is available only for users with the [Premium Plans](/premium).
## SEO Tab
The settings of the SEO Tab are placed into the parameters of the corresponding meta tags of the **HEAD** HTML tag at the top of the generated Website code.
!site-settings-seo.png!
### Language
Select the **Language** for your Site. This setting is set to **English** by default.
### Country
You can also specify the **Country** of your Site.
### Default Keywords
Specify the **Default Keywords** and **Phrases** to enable users to find your Site via search engines. These Keywords are put into the content parameter for the **KEYWORDS** meta tag and must be separated with a **comma**.
<meta name="keywords" content=">
### Default Description
Add a short paragraph of **Default Description** text describing your Website content. The search results show This text under the Website or Page URL. This text is put into the **DESCRIPTION** meta tag.
<meta name="description" content=">
### Image Lazy Loading
Enable the **Image Lazy Loading**, allowing you to load the Website images gradually while scrolling a web page. It decreases the web page's loading speed since the Website images are not loaded all at once, and it is recommended for good SEO.
### Disable Open Graph
You can enable the **Disable Open Graph** option in the SEO Tab of the Site Settings if you set the Open Graph properties in any external plugin.
## Google Tab
Use the Google tab of the Site Settings to assign your Site to supported **Google Services**.
!site-settings-google.png!
### Google Analytics ID
Enter your **Google Analytics ID** to assign your Site to the **Google Analytics** account and get your Site statistics. Read more about how to [set up Google Analytics](https://support.google.com/analytics/answer/9304153).
### Google Tag Manager
Enter the **Container ID** for your **Google Tag Manager**, a popular tag management system that allows you to update measurement codes and related code fragments quickly. Read more about how to [set up and install Tag Manager](https://support.google.com/tagmanager/answer/6103696?hl=en).
### Google Optimize Container
Use the **Container ID** to access your **Google Optimize Сontainer** settings that control each Container's email notifications, users, and accounts. Read more about editing [Optimize Container settings](https://support.google.com/optimize/answer/9100194).
### reCaptcha Site Key
The **reCaptcha Site Key** invokes the service on your Site. Learn more about the [reCAPTCHA Integration](page:61415).
### reCaptcha Secret Key
The **reCaptcha Secret Key** authorizes communication between the Site and the reCaptcha server to verify the submitter response. It would be best to keep the Secret Key safe for security purposes.
**NOTE:** The Security Key is required if you set the Site Key in the Site Settings. And if you do not enter it, you will see the Warning. For proper functioning, both ReCaptcha keys must be specified.
!secret-key-required.png!
Read more about how to use the [Google reCAPTCHA](https://cloud.google.com/recaptcha-enterprise/docs/create-key).
## HTML Tab
!site-settings-html.png!
### Meta Tags
Use the **Meta Tags** field to add other meta tags you want included, like "author," "contact," etc.
### Additional Head HTML
Place the custom HTML HEAD elements. They will be added to the HEAD section of each Site page.
## CSS Tab
Use the **Additional CSS** area to insert custom CSS code in the **CSS Tab**. The code will be added to the exported project stylesheet.
!site-settings-css.png!
## Cookie Tab
Use the Cookie Tab to edit the settings of the **Cookies Privacy Popup** on sites.
!site-settings-cookies.png!
### Show On All Pages
Check the **Show On All Pages** if you want to show the **Cookies Privacy Popup** on all the Site's pages, unlike on the home page.
### Edit Template Button
Click on the **Edit Template** to quickly access the **Cookies Privacy Popup** in the Theme Settings.
### Run Script After Cookie Acceptance
You can also enter the script to be run after clicking the Cookie Consent button on a site.
### Embed Google Fonts
Due to the General Data Protection Regulation (GDPR) of the European Union, the sites must **Embed Google Fonts** and not transfer any user information to third parties, including Google.
## Theme Tab
You can use Nicepage to create themes and templates for WordPress and Joomla. Therefore, you must specify theme information, which you can do in the **Theme Tab** of the Site Settings.
!site-settings-theme.png!
### Button To Theme Settings
You can open the Theme Settings by clicking the **Theme Settings** button in the Theme Tab.
### Theme Information
You can specify the **Author**, **Author URL**, **Version**, **Theme URL**, **Tags**, **Description**, and **Generator** for your Site's WordPress Theme or Joomla Template.
### Theme Thumbnail
Some CMS, like WordPress, require a **Thumbnail** to be shown in the Templates section. The themes show the default image if you do not upload another one.
## White Label Tab
**NOTE:** To use the **White Label Tab**, you MUST HAVE the Ultimate license. Read more about the [White Label](page:25538).
You can use the **White Label Tab** to enter your branding information for the Nicepage WordPress Plugin or Joomla Extension.
!site-settings-white-label.png!
### Branding Information
Specify the **Title**, **Author**, **Author URL**, and **Description** for your branded WordPress Plugin or Joomla Extension.
### Branding Logos
Enter the **Small Logo** on the WordPress sidebar and the Big Logo for the WordPress Plugins.
## Client License Tab
The [Pro and Ultimate](/premium) users can specify whether to allow editing of the site layout.
!site-settings-client-license.png!
##