Create and use the Custom WordPress Template to customize the layouts of WordPress Templates. You can learn about the WordPress Template Hierarchy from https://developer.wordpress.org/themes/basics/template-hierarchy/.
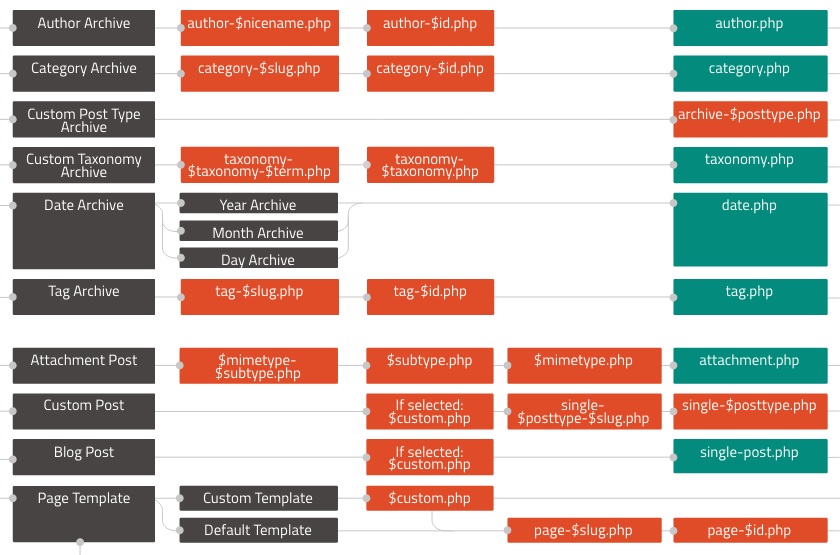
Original image from WordPress.org.
You can also read more about Custom Templates at WordPress.org:
Add Custom Template
You can add a new Custom WordPress template similar to Basic Templates at Theme -> Add Template.
Custom Template Type
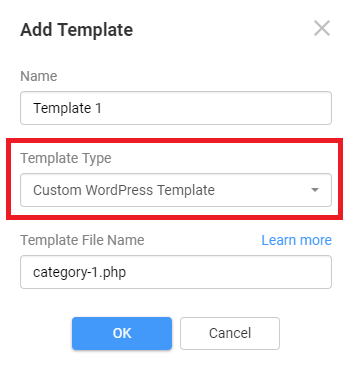
Choose the "Custom WordPress Template" option in the Add Template dialog.
Custom WordPress Template Name
From the WordPress Template Hierarchy, you can learn what templates you can modify in WordPress to output your content.
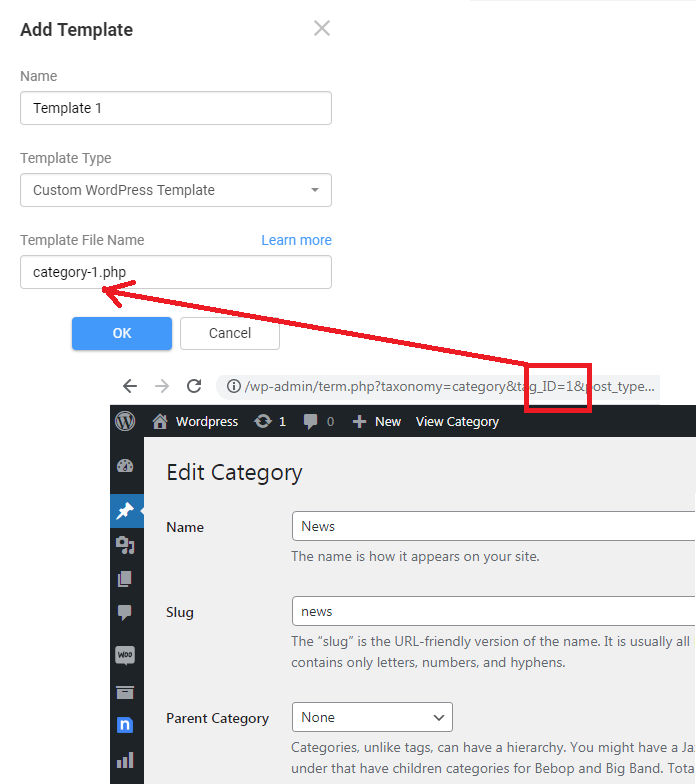
In the example below, we have entered the Template Name to output posts of a particular category. We have chosen the "News" category with ID=1 for demonstration purposes. However, you can select any template supported in WordPress, allowing customization.
You can additionally read about the WP Category Templates.
Rename Custom Template
Later, if needed, you can rename the Custom WordPress Template by changing the value in the Template Name field in the Property Panel.
Stylize Custom Template
After adding a new custom template, you must modify its layout and stylize its Elements. You can also use the Block Presets. In our example, to output Posts of the "News" category with the custom category-1.php template, we will add the three-column preset containing the Blog Posts Element.
Theme Export
You are ready to install the Theme into your CMS. For that, export your Theme containing the custom category-1.php template.
Theme Installation
Install the exported Theme into your WordPress. Activate your Theme after the installation is complete.
Preview Custom Category Template
We must check if we have imported the custom category-1.php Template in our example. Go to Posts-> Categories, locate the News category in the Categories table, and click the View link.
View On Live Website
In the browser, you will see the customized Template outputting the posts of the News category and the URL in the address bar showing the path to that category on your website.
Create and use the Custom WordPress Template to customize the layouts of WordPress Templates. You can learn about the WordPress Template Hierarchy from https://developer.wordpress.org/themes/basics/template-hierarchy/.
<a href="https://developer.wordpress.org/themes/basics/template-hierarchy/" target="_blank"><img src="https://resources.nicepage.com/872/50872/wp-template-hierarchy.jpg" style="max-width: 850px;"></a>
Original image from [WordPress.org](https://developer.wordpress.org/themes/basics/template-hierarchy/).
You can also read more about Custom Templates at WordPress.org:
- WP Category Templates
https://codex.wordpress.org/Category_Templates
- WP Taxonomies
https://codex.wordpress.org/Taxonomies
## Add Custom Template
You can add a new Custom WordPress template similar to Basic Templates at Theme -> Add Template.
!add-new-custom-wordpress-template.png!
## Custom Template Type
Choose the "Custom WordPress Template" option in the Add Template dialog.
!select-template-type.png!
## Custom WordPress Template Name
From the [WordPress Template Hierarchy](https://developer.wordpress.org/themes/basics/template-hierarchy/), you can learn what templates you can modify in WordPress to output your content.
In the example below, we have entered the Template Name to output posts of a particular category. We have chosen the "News" category with ID=1 for demonstration purposes. However, you can select any template supported in WordPress, allowing customization.
!setting-custom-template-name.png!
You can additionally read about the [WP Category Templates](https://codex.wordpress.org/Category_Templates).
## Rename Custom Template
Later, if needed, you can rename the Custom WordPress Template by changing the value in the Template Name field in the Property Panel.
!rename-custom-template.png!
## Stylize Custom Template
After adding a new custom template, you must modify its layout and stylize its Elements. You can also use the Block Presets. In our example, to output Posts of the "News" category with the custom **category-1.php** template, we will add the three-column preset containing the [Blog Posts](page:83207) Element.
!adding-content-to-template.png!
## Theme Export
You are ready to install the Theme into your CMS. For that, export your Theme containing the custom **category-1.php** template.
!export-theme.png!
### Theme Installation
Install the exported Theme into your WordPress. Activate your Theme after the installation is complete.
!installing-wp-theme.png!
## Preview Custom Category Template
We must check if we have imported the custom **category-1.php** Template in our example. Go to Posts-> Categories, locate the News category in the Categories table, and click the View link.
!link-to-news-category-template.png!
### View On Live Website
In the browser, you will see the customized Template outputting the posts of the News category and the URL in the address bar showing the path to that category on your website.
!live-view-custom-category-template.png!
##